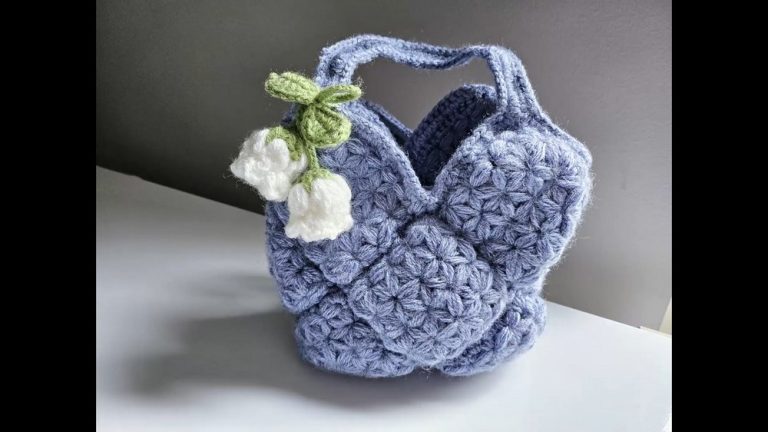
How to Crochet Tulip Bag for Spring

Learn how to crochet an amigurumi tulip bag for your spring outings, market visits, and home decoration with a step-by-step tutorial from Misyel Shin. This bag is shaped like a giant crochet tulip with the flower has space for holding your essentials instead of stuffing.
This crochet bag can be crocheted in any color of natural tulip with the option available for adjusting the strap length. You can also crochet this tulip bag for gifting to someone.
The complete video guide for crocheting this bag will be available at the end of this post and for more insights, scroll down below.

Skills Needed: Creating a magic ring, single crochets (SC), slip stitches (Sl St), and gradual increases (Inc) for shaping the tulip flower and bag body. Intermediate skills include alternating between single, double, and treble crochets for decorative edging and working decreases for shaping leaves. Crocheting a double-chain handle and assembling the bag with precise attachment techniques.
Guide Span: 27 Minutes Only
Personalization Tips: You can omit the strap and fill the stuffing in the flower top for crocheting a nice tulip amigurumi. Choose colors from red, yellow, and purple as they are the most popular.

This crochet tulip bag tutorial begins with forming the tulip flower, followed by crocheting the bag body and decorative leaves. It crochets shaping and assembling professionally, making it an excellent project for both beginners and intermediate crocheters.
Free Crochet Flower Fruit Bag Pattern
Materials
- Yarn: Milk cotton knitting yarn (or any similar #3 light/DK cotton or acrylic yarn), in pink for the flower, brown/green for the stem and leaves, and other colors for decorative embellishments as you prefer.
- Crochet Hook: 4.0mm (US G/6 or, as noted, a “hook number 7” if referencing local sizing)
- Stuffing: Polyester fiberfill (Dacron) for the stem/stalk
- Large-eye Yarn Needle: For sewing and weaving in ends
- Scissors
- Hot Glue Gun (optional): For assembly
- Stitch Marker (recommended): To keep track of rounds
Key Abbreviations (US terms)
| Abbreviation | Meaning |
|---|---|
| MR | Magic Ring |
| ch | Chain |
| sc | Single Crochet |
| dc | Double Crochet |
| tr | Treble Crochet |
| hdc | Half Double Crochet |
| inc | Increase (2 sc in one st) |
| dec | Decrease (2 st together) |
| sl st | Slip Stitch |
| st(s) | Stitch(es) |
Special Notes
- Work in continuous rounds unless otherwise instructed.
- Use a stitch marker to mark the first stitch of each round if needed.
- The flower portion forms the main pocket/bag; the bottom and stem/leaves are made and attached separately.
- Adjust the bag’s height by adding or subtracting rounds before final shaping.
Pattern

Bag Pocket (Flower Petal)
With pink (or main flower color):
Round 1:
Make a MR, work 6 sc in MR. Pull tight to close. (6 sts)
Join with a sl st to the first sc.
Round 2:
Ch 1, inc in each st around (2 sc in each st). (12 sts)
Join with a sl st to the first sc.
Round 3:
Ch 1, (inc, sc) around, repeat 6 times. (18 sts)
Join with a sl st to the first sc.
Round 4:
Ch 1, (sc, inc, sc) around, repeat 6 times. (24 sts)
Join with a sl st to the first sc.
Round 5:
Ch 1, (sc, sc, inc) around, repeat 6 times. (30 sts)
Join with a sl st to the first sc.
Round 6:
Ch 1, (sc, sc, sc, inc) around, repeat 6 times. (36 sts)
Join with a sl st to the first sc.
Round 7:
Ch 1, (sc 5, inc) around, repeat 6 times. (42 sts)
Join with a sl st to the first sc.
Round 8:
Ch 1, (sc 3, inc, sc 3) around, repeat 6 times. (48 sts)
Join with a sl st to the first sc.
Rounds 9–18:
Work 1 sc in each st around. No increases. (48 sts each round)
Join with a sl st at the end of each round.
Note:
Adjust the number of rounds here to change the height of your bag. More rounds will make the bag deeper.
Petal Shaping (Optional: Add one decorative scalloped edge per section)
[Work in sets around the bag, repeat 6 times]
- sl st, sc, hdc, dc, tr, dc, hdc, sc, sl st into each set of stitches, forming the scalloped edge of a petal.
Break yarn and fasten off main bag body.
Bottom and Stem
With brown/green yarn:
Bottom:
Round 1:
Make a MR, 8 sc in MR. Pull tight to close. (8 sts)
Rounds 2–8:
Work 1 sc in each st around. (8 sts)
This will form a short tube for the stem/stalk.
Stuff the tube lightly with Dacron/fiberfill as you go.
Break yarn, leaving a tail for sewing.
Leaf (Make 2)
With green:
Round 1:
Make a MR, 3 sc in MR. Pull tight to close. (3 sts)
Sl st to first sc.
Round 2:
Ch 1, inc in each st around. (6 sts)
Sl st to first sc.
Round 3:
Ch 1, (inc, sc) around x2. (9 sts)
Sl st to first sc.
Round 4:
Ch 1, (inc, sc, sc) around x2. (12 sts)
Sl st to first sc.
Round 5:
Ch 1, sc in each st around (12 sts)
Sl st to first sc.
Round 6 (Leaf Shaping):
- (dec, sc, sc) around, repeat as necessary.
- Sl st to close.
You may shape the leaf as desired by adding more rounds for length or decreasing for a point. Fasten off.
Assembly
- Fill the stem with fiberfill and use hot glue or sew the bottom closed if needed.
- Attach stem to the center bottom of the flower bag using hot glue or sew it securely.
- Attach leaves to the base of the stem with hot glue or by sewing.
- Optional: Decorate with small crocheted circles, beads, or your choice of embellishments.
Handle (Double Chain Cord)
- Cut two yarn lengths about 1 meter/yard each (you may make it longer if desired).
- Hold together and make a slip knot securing both strands, then begin a standard foundation chain, using both yarns together (double chain stitch) until the handle reaches your desired length.
- Attach each end to opposite sides of the bag opening securely.

Pattern Corrections & Tips
- Stitch counts may shift slightly based on tension; always count stitches at the end of each round.
- For best results, join each round with a sl st and begin each round with a ch 1 (unless working in a spiral).
- To make the bag deeper, simply add more rounds to the bag body before final shaping.
- Adjust color changes or add surface decorations as desired for a personalized look.
Conclusion
Congratulations, your Flower Fruit Bag is now complete! This versatile and charming accessory is perfect for holding small items and makes a delightful handmade gift or decorative element. Feel free to customize with additional embellishments or adjust the handle for comfortable use.