How to Crochet Tulip Flower (Tutorial for Beginners)
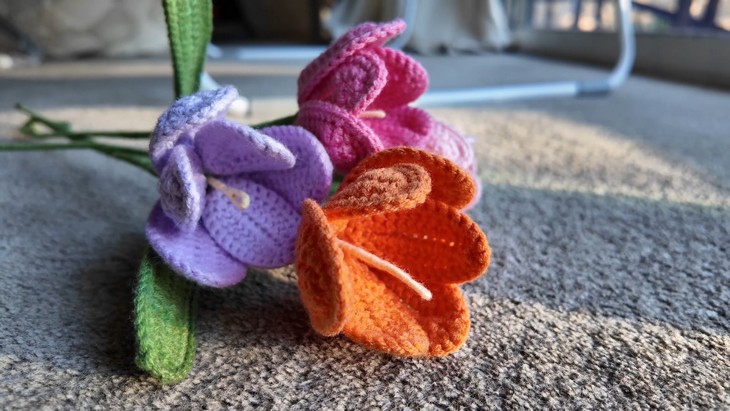
Looking for a decor to welcome spring? Learn how to crochet a realistic tulip flower in any color with this step-by-step tutorial. You will learn how to crochet both small and large petals for a life-like look.
The tutorial also includes complete assembly instructions for creating a tulip bouquet perfect for a wedding gift or putting into a vase. Let’s get started!

This tulip flower project uses basic stitches like chain, single crochet, half double crochet, and double crochet, arranged strategically to shape realistic petals and leaves.

A key skill is crocheting around floral wire, which adds structure to each piece. Simple techniques like slip stitching, working in both sides of the chain, and wrapping yarn around wire help finish and assemble the flower neatly.
Free Crochet Tulip Flowers Pattern
Materials List
- Yarn: 4-ply milk cotton yarn
- Yellow (flower center)
- Green (leaf & stem)
- Color of choice (petals)
- Crochet hook: 2.5 mm
- Floral wire:
- Two sizes: 25 cm length (or cut to size), folded in half to ~12 cm for petals and center
- Long wire (2 mm thick, ~40 cm) for main stem
- Floral tape or green yarn (for wrapping stems)
- Hot glue gun or strong craft glue
- Scissors
- Yarn needle
Key Abbreviations (US Terms)
| Abbreviation | Meaning |
|---|---|
| ch | chain |
| sc | single crochet |
| hdc | half double crochet |
| dc | double crochet |
| sl st | slip stitch |
| st(s) | stitch(es) |
Special Notes
- Crochet tightly for structure.
- Use the wire as you crochet the final round of each petal/leaf for shaping and stiffness.
- Petal count: 3 small, 3 large per flower.
- Pistil: 3 per flower.
- Adjust petal color as desired.
Pattern

Small Petal (Make 3)
With petal color, ch 13.
Row 1:
Starting in 2nd ch from hook:
- 1 sc
- 1 hdc in next ch
- 1 dc in each of next 7 ch (7 dc)
- 1 hdc in next ch
- 1 sc in next ch
- 3 sc in last ch (this forms top curve)
Turn piece to work back down other side of chain (bottom of petal):
- 1 sc in next ch
- 1 hdc in next ch
- 1 dc in next 7 ch
- 1 hdc in next ch
- 1 sc in last ch
Sl st into 1st sc of row.
Do not fasten off.
Row 2 (work around wire):
- Ch 1.
- Hold cut wire (12–13 cm, folded in half) along edge (see assembly for details).
- Sc 12 evenly along edge, crocheting over the wire.
- In top stitch: 3 sc in same st.
- Continue sc 11 down other side, over wire.
- 2 sc in last st.
- Sl st to first sc of round to close.
Fasten off, leaving a long tail.
Neatly wrap yarn tail around bottom of wire, split and twist wire ends together for stability.
Large Petal (Make 3)
With petal color, ch 13.
Row 1:
Starting in 2nd ch from hook:
- 1 sc
- 11 sc (one in each ch)
- At last ch: 3 sc in same st (forms top)
Now work back down other side of foundation chain:
- 11 sc
- Sl st to first sc of row.
Row 2:
Ch 1.
- 2 sc in same st (increase at start)
- 1 hdc in next st
- 8 dc in next 8 sts
- 1 hdc in next st
- 1 sc in next st
- In top of the petal: 3 sc in same st
- On other side:
- 1 sc
- 1 hdc in next st
- 8 dc in next 8 sts
- 1 hdc
- 2 sc in last st (increase at end)
- Sl st to first sc.
Row 3 (work around wire):
- Ch 1.
- Hold wire (12–13 cm, folded in half) along edge.
- 14 sc along edge, crocheting over the wire
- 3 sc in topmost st
- 13 sc down other side
- 2 sc in last st
- Sl st to first sc to close.
Fasten off and wrap yarn tail around bottom of petal and wire. Twist wire ends together.
Leaf (Make 1 per flower; can make more for variety)
With green, ch 30.
Row 1:
Starting in 2nd ch from hook:
- 1 sc in next 2 ch
- 3 hdc in next 3 ch
- 18 dc in next 18 ch
- 3 hdc in next 3 ch
- 2 sc in next 2 ch
- 3 sc in last ch (forms tip)
Turn and work down other side of chain:
- 2 sc
- 3 hdc
- 18 dc
- 3 hdc
- 2 sc
Sl st to first sc.
Row 2 (work around long wire):
Ch 1.
- Hold long wire in place along edge.
- 29 sc evenly around up to the tip of the leaf
- In tip: 3 sc in same st
- 29 sc down the other side
- Sl st to first sc, fasten off.
Securely wrap yarn around wire at base. Adjust and shape leaf around wire.
Flower Center (Pistil) – Make 3 per flower
- Cut wire to ~12 cm.
- Using yellow yarn, firmly wrap yarn around wire starting from ~¼ down length, covering several times to form a thick center (like a small yellow “nub”).
- Bend top end into a small loop to prevent yarn slipping.
- Twist wire ends together below the flower head (so all three pistils are bundled and secure).
- Leave long wire ends to attach to stem later.
Assembly
- Prepare Main Stem:
- Use long, thick floral wire (or gather shorter wires).
- Attach pistils to stem using hot glue or tightly wrapping green yarn.
- Attach Small Petals:
- Glue or wrap 3 small petals evenly spaced around pistil bundle.
- Wrap base with green yarn for neat finish.
- Attach Large Petals:
- Place 3 large petals in gaps between small petals, staggering for authentic look.
- Secure with glue or more green yarn.
- Wrap Yarn or Tape:
- Firmly wrap green yarn/floral tape down the stem, covering all joins and wire twists.
- Attach Leaf:
- Position leaf at lower portion of stem, secure with glue/yarn, continue wrapping down stem.
- Finish:
- Secure yarn at base with strong glue or a knot.
- Shape petals and leaf as desired.

Pattern Correction
- Pay careful attention to petal shaping at the top and bottom curves.
- Be sure to add all increases in “3 sc in one st” at the tip of petals and leaf for smooth, rounded shapes.
- If your petal or leaf edges seem uneven, block the finished piece lightly.
Tips
- When wrapping yarn or tape, keep it snug for neatness and stability.
- For more robust stems, double up the floral wire.
- Use pliers to help twist wires for neat, sturdy assembly.
- Shape petals/leaves once fully assembled to achieve a lifelike look.
Conclusion
You have now completed a realistic, elegant crochet tulip! Mix and match petal colors and sizes for a beautiful bouquet. These tulips make heartfelt gifts and lasting décor—with endless options for color and arrangement.
Video Guide
https://youtu.be/-jm8sZsj8eQ