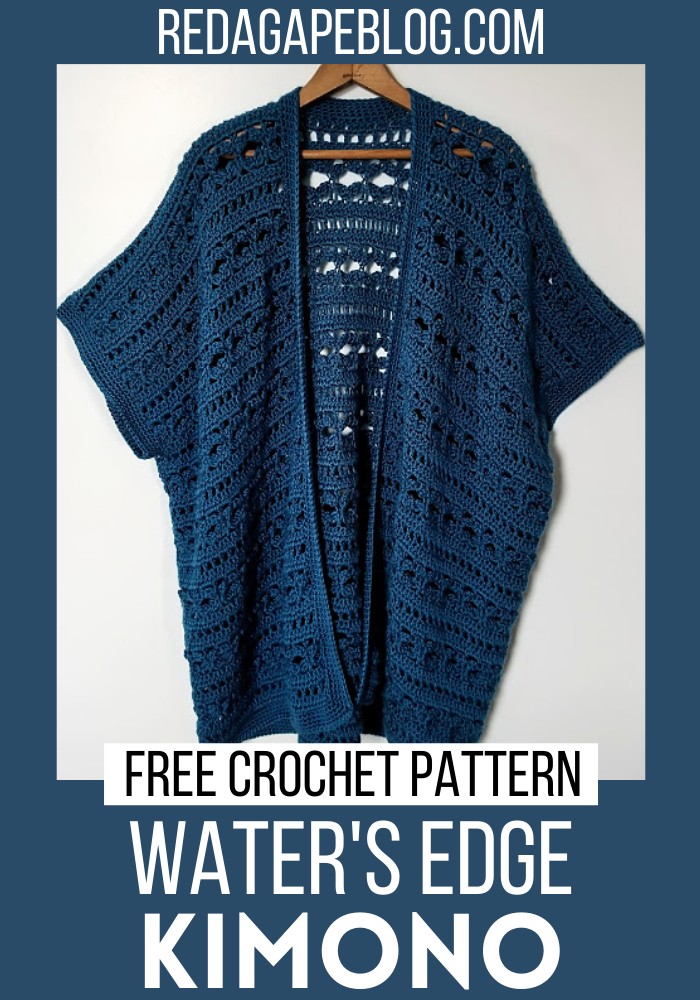
Crochet Water’s Edge Kimono Pattern Free

Kimonos are a fantastic blend of comfort, style, and warmth adding style to whatever you’re wearing. The Crochet Water’s Edge Kimono is designed with this spirit of comfort and fashion in mind. Made to welcome the warmer days of spring, yet versatile enough for other seasons, it’s a layer you’ll reach for again and again. With its lacy pattern, this crochet kimono adds a hint of elegance, whether paired with a long-sleeved blouse on cooler days or draped over a tank top when the sun is shining. Constructed simply from three rectangular panels, it reveals a thoughtful design that uses soft, light yarn, giving your skin a treat as you wear it. Whether stitched to be long and flowing or customized to your taste, this all-season accessory is more than a piece of clothing!
Crochet Water’s Edge Kimono
Making Your Crochet Water’s Edge Kimono
Materials Used
- 4 (5, 6) skeins of Caron Simply Soft – Ocean – 6 oz/170 g – 315 yds/ 288 m
- H/8 (5.00 mm) hook
- J/10 (5.75 mm) hook
- Stitch markers or safety pins
- Tapestry needle
- Measuring tape for armholes
Skill Level
Intermediate
Size guide
- Small: 100 chains
- Medium: 106 chains
- Large: 112 chains
- XL: 118 chains
- 2XL: 124 chains
- 3XL: 130 chains
Stitch guide
- Foundation chain: FC
- Yarn over: YO
- Chain: ch
- Stitch: st
- Single crochet: sc
- Double crochet: dc
- Triple (treble) crochet: tc
- Slip stitch: sl st
- Modified Cluster Stitch: MCS
Note
- The pattern is designed to be oversized, adjust the chains and rows to fit your desired size. The pattern is made up of 3 rectangular panels that are seamed together and then a border is added around the sleeves and the main body of the kimono.
Step by step Pattern
Back Panel
- The back panel is made first using a size ‘H’ hook.
- Row 1: Starting from the 5th chain from the hook, perform a dc in each chain across.
- Row 2: Chain 4 (this counts as dc + ch 1), skip the stitch the chain 4 comes out of, then skip the next stitch. Repeat ‘dc in next st, ch 1, skip 1 st’ across. In top of chain 4 turning chain, dc. Turn.
- Row 3: Chain 3 (this counts as dc). In chain-1 space, dc. Dc in each stitch across. Dc in the chain-4 space. In the third chain of the chain 4 from previous row, dc. Turn.
- Row 4: Chain 1, sc in the same stitch chain-1 comes out of. Repeat ‘ch 3, MCS in the side of the sc, skip 2 sts, dc in next st, ch 4, MCS in the first chain of the chain 4, skip 2 sts, sc in next stitch’ across. The last sc of the row is worked into the top of the chain 3 turning chain.
- Row 5: Chain 8. In the 5th chain from Hook, MCS. Sc in dc from the previous row, ch 3, MCS in the side of the sc. Repeat across, ending with a tc in 1st sc made of the previous row.
- Row 6: Chain 1, sc in same chain 1 space. Repeat ‘ch 2, dc in sc between petals, ch 2, sc in between next set of petals, ch 2’ across. Sc in the 4th turning chain of the previous row.
- Row 7: Chain 3 (counts as dc), 2 dc in chain-2 space. Dc in the next stitch. Repeat ‘2 dc in chain-2 space’ across. Dc in sc from previous row.
- Repeat Row 2 – Row 7 for the pattern up to the desired length, then finish off and weave in ends.
Side Panels
- The side panels are made in the same way as the back panel. Make two side panels using an ‘H’ hook. Create the side panels to the same length as the back panel, then finish off and weave in the ends.
Assemble
- Use a tapestry needle and yarn to seam together the three panels. Trim is then added around the armholes and the main body opening to finish off the garment.