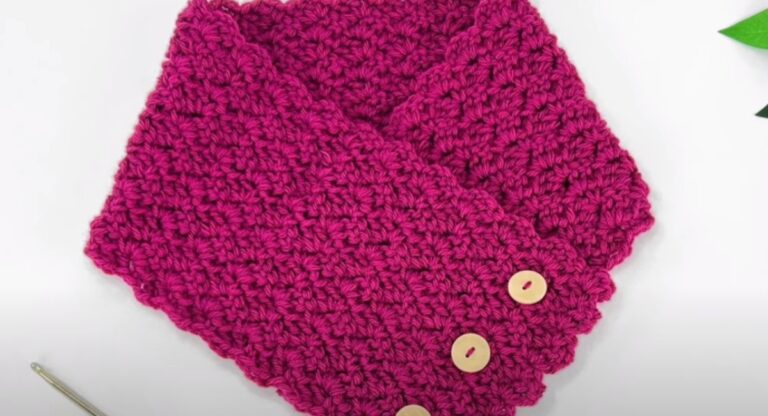
Granny Square Pocket Scarf Free

Granny squares are a cornerstone of crochet, beloved for their versatility, colorfulness, and ability to be combined in countless ways. When these vibrant squares are stitched together to create a Pocket Scarf, the result is both practical and stylish. Its versatility lies in the ability to match any outfit, thanks to its classic black color along with a hint of Cyber Leaf hue. Utilizing granny squares to craft a crochet Pocket Scarf not only allows for a warm, personalized accessory but also adds the unique touch of having pockets. These pockets introduce a blend of functionality and design, making this crochet scarf pattern a perfect example of how traditional techniques can meet modern needs in a chic and useful way.
Granny Square Pocket Scarf

Making Your Granny Square Pocket Scarf
- 5.5 mm) crochet hook,
- Yarn needle
- Scissors.
- Easy
- Scarf measures: 6½”(16.5 cm) x 78” (198 cm)
Gauge:
- 12 sc and 15 rows 4” (10.16 cm) x 4” (10.16 cm) using a 5.5 mm crochet hook.
Granny Squares (Make 12)
- Start: Make a magic circle
- Rd 1: Ch 3, 2 dc, ch 2, * 3 dc, ch 2; repeat from * two more times, join to beginning ch 3. (4 dc clusters, 4 ch-2 sps).
- Rd 2: Sl st to the next ch-3 sp, sl st in ch-3 sp, (ch 3, 2 dc, ch 2, 3 dc) in the same sp, (corner made), * ch 1, 3 dc, ch 2, 3 dc in the next space; repeat from * two more times, ch 1, join to beginning ch 3. (8 dc clusters, 4 ch-2 sps, 4 ch-1 sps).
- Rd 3: Sl st to the next ch-3 sp, sl st in ch-3 sp, (ch 3, 2 dc, ch 2, 3 dc) in the same sp, * ch 1, 3 dc, in the next ch 1 sp, ch 1, (3 dc, ch 2, 3 dc) in the ch 2 corner sp; repeat from * around, ch 1, join to beginning ch 3. (12 dc clusters, 4 ch-2 sps, 8 ch-1 sps).
- Rd 4: Sl st to the next ch-3 sp, sl st in ch-3 sp, (ch 3, 2 dc, ch 2, 3 dc) in the same sp, ch 1, (3 dc, in the next ch 1 sp, ch 1) 2 times, * (3 dc, ch 2, 3 dc) in the ch 2 corner sp, ch 1, (3 dc, in the next ch 1 sp, ch 1) 2 times; repeat from * around, join to beginning ch 3. (16 dc clusters, 4 ch-2 sps, 12 ch- 1 sps).
- Rd 5: Sl st to the next ch-3 sp, sl st in ch-3 sp, (ch 3, 2 dc, ch 2, 3 dc) in the same sp, ch 1, (3 dc, in the next ch 1 sp, ch 1) 3 times, * (3 dc, ch 2, 3 dc) in the ch 2 corner sp, ch 1, (3 dc, in the next ch 1 sp, ch 1) 3 times; repeat from * around, join to beginning ch 3, fasten off, Weave in ends. (20 dc clusters, 4 ch-2 sps, 16 ch- 1 sps).
Solid Squares (Make 2)
- Start: Chain 19
- Row 1: Sc in the 2nd ch from hook and in each ch across, ch 1, turn. (18 sc)
- Row 2: Sc in first sc and in each st across, ch 1, turn. (18 sc)
- Rows 3-20: Repeat row 2, fasten off after row 20, weave in ends. (18 sc)
- End: Block all the squares
Putting the Scarf Together
Use the invisible join method to connect 10 Granny squares. Following that, join a solid square at each end(you are essentially creating pockets at this stage). For a better understanding of the invisible join method, refer to the video by B. Hooked Crochet.
Edging and Pockets
With the scarf right side facing up, place one granny square right side up on top of each of the solid squares.
- Join yarn in the corner, making sure to catch both the granny square and solid square, sc in the corner and in each st to the next corner.
- Work up the side of the scarf performing a sc in each stitch to the next corner.
- Make sure to work through both squares when you arrive at the pocket.
- Continue this process on the other end and side of the scarf.
- Join to beg sc, fasten off, sc across the pocket edge on both pockets.
- Fasten off and weave in ends.