Cute Crochet Baseball Keychain Free Pattern For Bag +Tutorial
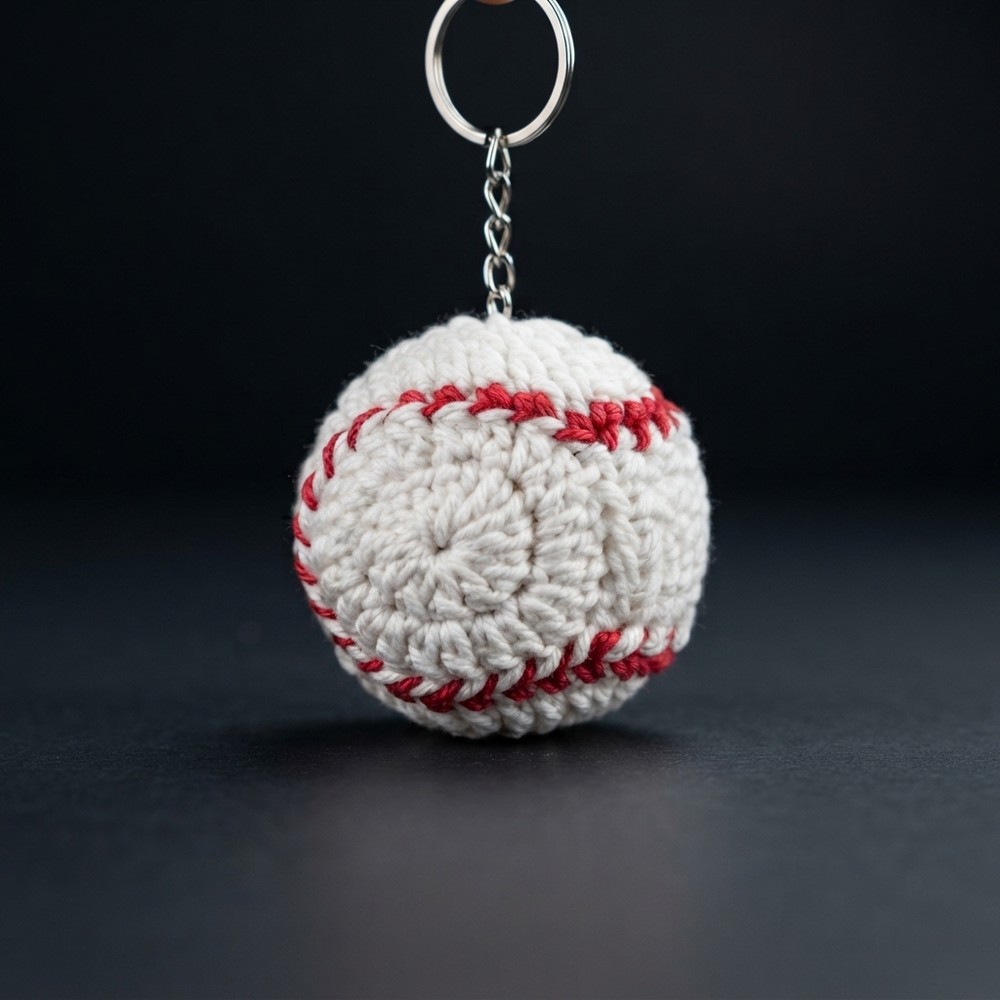
Give your keys bags or gifts a unique crochet baseball keychain that offers charm and personality with simple fun steps easy for anyone to follow.
Have you ever wanted a small, sporty accessory that shows off your love for baseball? The Crochet Baseball Keychain by Crochet Mania is just that—a cute, round keychain that looks just like a real baseball. It stands out with its white base and bright red details that match the stitches on an actual baseball.
Fun Crochet Baseball Keychain Free Pattern for Baseball Fans
This keychain fits perfectly on keys or backpacks and adds a friendly, fun touch wherever it goes. Its soft yarn texture feels nice in your hand, unlike regular metal or plastic keychains. Baseball fans and crochet lovers alike will find this little item charming and enjoyable to carry every day.

The miniature ball size makes it easy to take along, whether you’re heading to a game or just out and about. It can also serve as a small, thoughtful gift for friends who like baseball or unique accessories. Crochet Mania’s work offers an enjoyable way to add personality to everyday objects. The attention to detail makes this keychain stand out and feel special.
If you’d like to try your hand at this charming Crochet Baseball Keychain, a free pattern is available to help you put it together. Feel free to check it out and add a sporty touch to your belongings!
Crochet Baseball Keychain Pattern
Today we’re going to work on a nice project—a baseball-shaped crochet keychain. In this step-by-step guide, you’ll follow each technique for making a sturdy, adorable ball with detailed slip-stitch join and the classic red “stitching.” This project is fast, fun, and uses little material.
Pattern Basic Points
Project Highlights
- Classic Ball Construction: Worked in the round with double crochet, then extended with rows for the sides.
- Sturdy Slip Stitch Join: Two disks are crocheted or sewn together for durability.
- Two-Tone Look: Easy color accents to mimic baseball stitching.
- Customizable: Change base color or stitch color to suit your style.
- Functional Keychain: Easy attachment point for a ring.

Special Notes
- The magic ring ensures a seamless starting point for a polished look.
- The body is primarily in double crochet, giving you speed and uniformity.
- All assembly techniques rely on basic stitches: single crochet, slip stitch, and a neat sewing method.
- Maintain even stitch tension for professional results and symmetry.
Skill Level
Beginner to Advanced Beginner
Basic skills such as magic ring, double crochet, single crochet, and joining techniques are required. No shaping or complex construction is needed.
Materials
- Yarn: White for the main ball; red or accent color for “stitching”
- Crochet Hook: Size to match your yarn (commonly 2.5–3.5 mm for amigurumi or tight-weave keychains)
- Yarn Needle: For sewing pieces and weaving in ends
- Fiberfill: For stuffing
- Keyring: For final assembly
- Scissors
Measurements / Sizing
- Diameter: Finished ball is approx. 4–5 cm (1.5–2 inches), depending on yarn/hook size
- Thickness: About 2 cm when lightly stuffed
- Overall length: 6–8 cm with keyring
Gauge
Not critical for this project; stitches should be fairly tight to prevent stuffing from showing between stitches. A typical gauge is roughly 9–10 dc in 5 cm.
Stitch Abbreviations
- mr: magic ring
- ch: chain
- dc: double crochet (high point)
- sc: single crochet (low point)
- sl st: slip stitch
Special Stitches
- Magic Ring (mr): Forms a tight, seamless center for the ball.
- Slip Stitch Join: Used for both joining motifs and adding accents.
Crochet Pattern
Step 1: Crochet the Ball Motifs (Make 2)
Round 1 (Base Circle)
- With white yarn, make a magic ring.
- Ch 3 (counts as first dc).
- Work 12 dc into the ring (you should have 13 dcs counting the initial ch 3, but follow video’s count for 12).
- Pull ring tight.
- Sl st into the first dc (not the third chain)—this means slip stitch into the first actual dc, not into the starting chain, for a clean join.
- [Set aside first circle; work second circle identically up to this point.]

Round 2 (Circle Increase)
- Ch 2 (serves as turning chains).
- In the same first stitch:
- 2 dc (first increase)
- Continue:
- 2 dc in each stitch around for a total of 12 increases (you’ll have 24 dc at end of round).
- Sl st into first dc (not chain).

Repeat for Second Disk:
- Make a second identical disk.
Step 2: Shaping the Sides
Side Strip (Work on one motif):
- Ch 1.
- 6 sc, working across 6 stitches of the disk.
- This starts your “strip” that will wrap around the ball.
- Rows 1–6:
- Ch 1, turn, 6 sc.
- Repeat this process for each row, ending after row 6.
- Cut yarn, leaving a long tail for sewing.
Step 3: Join Sides to Form Ball Shape
- Hold both disks with right sides together, matching up the edge of the sc strip from your side rows.
- With your yarn needle, sew through both thicknesses using both loops of each stitch for a secure seam.
- Secure tightly at beginning/end.
- Hide your yarn tail inside for a clean finish.

Step 4: Red Stitch Detailing (Baseball Accent)
- Thread a red yarn onto needle.
- Begin at the start of the seam where the motif “extension” is located.
- Slip stitch or embroider in a zigzag or “V” shape across the seam to mimic baseball stitching.
- Insert at one point, emerge at next equivalent spot on the second side, and continue in a regular, neat pattern.
- Knot securely at finishing points.
Step 5: Join Both Motifs and Add Stuffing
- Continue as you did for the previous seam, now working the main circular edge:Insert hook (or needle if sewing) through matching stitches of both disks.x
- Advance, joining with sc or whipstitch.
- Leave a small opening to insert a little fiberfill stuffing for shape—do not overfill.
- Finish the seam by joining the last stitches securely.
- Weave in all ends.
Step 6: Attach Keyring
- Use the long sewn tail or a scrap of yarn:
- Thread through the top of the ball, anchoring securely by weaving through several stitches.
- Loop keyring onto the yarn and knot or sew in place, ensuring it holds firm.
- Trim any excess thread.
Assembly & Finished Size
- Ensure your baseball has a round, slightly puffy shape.
- Double check all seams for tightness.
- Accent stitches should be even and visible.
- Attach the keyring at your preferred spot (top or side).
- Ball should sit comfortably in palm; lightweight and strong.


Conclusion
This quick, adaptable project is ideal for practicing basic stitches, using up scrap yarn, and making functional keepsakes or gifts in just an hour or two. The contrast join adds strong construction—and the bright red “stitches” give that classic sporty look. Personalize with team colors or swap yarn for added fun.