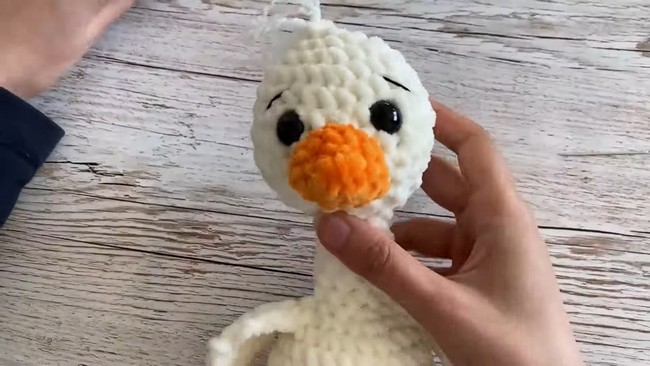
How to Crochet Amigurumi Baby Goose Plushie for Beginners

In this post, you’ll learn how to crochet super squishy and soft amigurumi baby goose using chenille yarn with a step-by-step tutorial from Cozy Cuddly Plushies. The project uses basic crochet amigurumi skills and will result in a doll-style goose amigurumi perfect for gifting to your little ones. You can also crochet it in small size by using a usual yarn weight.
This tutorial will teach you crocheting each part of the goose, such as the head, beak, wings, and feet, with clear instructions and on-screen pattern. A small but attractive detail that makes it more unique is the addition of fuzzy hair.
For both beginners and experts, we have shared the complete video guide at the end of this post. For getting more information about this crochet baby goose amigurumi, read more below.

Skills Used: Magic ring, single crochets, half-double crochets, and invisible decreases, which help shape the head, body, and limbs of the duck. It also introduces assembly skills, such as sewing different parts together neatly and creating fluffy hair using cut yarn strands.
Embroidery techniques are used to add details like eyebrows, giving the duck a required character.
Guide Span: 38 Minutes Only
Personalization Tips: Popular colors combinations except the white and orange you can turn your goose into the crochet duck by adding green yarn for the head and limbs and yellow for the beak or into a basic yellow duck with the orange for the limbs.
You can add accessories like a small bow tie, scarf, baby tiny hat for extra charm. Fluffy hair can be styled differently, such as making it longer or using multi-colored yarn for a whimsical effect.
Crochet Baby Goose Tutorial
Crocheting a basic goose will be never easier than this crochet goose amigurumi tutorial. The step-by-step instructions are very easy-to-follow if you are comfortable with abbreviations, and the project is highly customizable, allowing for different yarn colors and additional embellishments. The finished duck will also make a wonderful gift or keepsake.
- Step-by-Step Construction: The duck’s head and body are crocheted using rounds of single crochets, increases, and invisible decreases. The beak and wings are made separately and sewn onto the duck. Legs and feet are shaped with half-double crochets and attached at the base.
- Finishing Touches: Fluffy hair is added using medium-weight yarn, and eyebrows are embroidered with black floss for personality. The pieces are assembled to complete the baby duck plush.

Supplies Used
You will need following crochet supplies based on the recommendations from the tutor. Along with these materials, while crocheting the goose amigurumi you will also have to follow the tension of tutor for getting similar results:
- Chenille yarn in white and orange
- 4.5 mm crochet hook
- Black embroidery thread
- Yarn needle
- Black safety eyes
- Fiber stuffing
- Acrylic yarn for fuzzy hair

Stitches and Guides
Following are the stitches that the tutor uses for crocheting this goose amigurumi:
- Single Crochet (sc): Insert hook into stitch, yarn over, pull through, yarn over, pull through both loops on hook.
- Half-Double Crochet (hdc): Yarn over, insert hook into stitch, yarn over, pull through, yarn over, pull through all three loops on hook.
- Increase (inc): Work two stitches into the same stitch.
- Decrease (dec): Insert hook into stitch, yarn over, pull through, insert hook into next stitch, yarn over, pull through, yarn over, pull through all loops on hook.
- Slip Stitch (sl st): Insert hook into stitch, yarn over, pull through stitch and the loop on your hook.
- Chain (ch): Yarn over, pull through the loop on your hook.