Sleek Crochet Ribbed Crop Top Pattern That Feels Modern
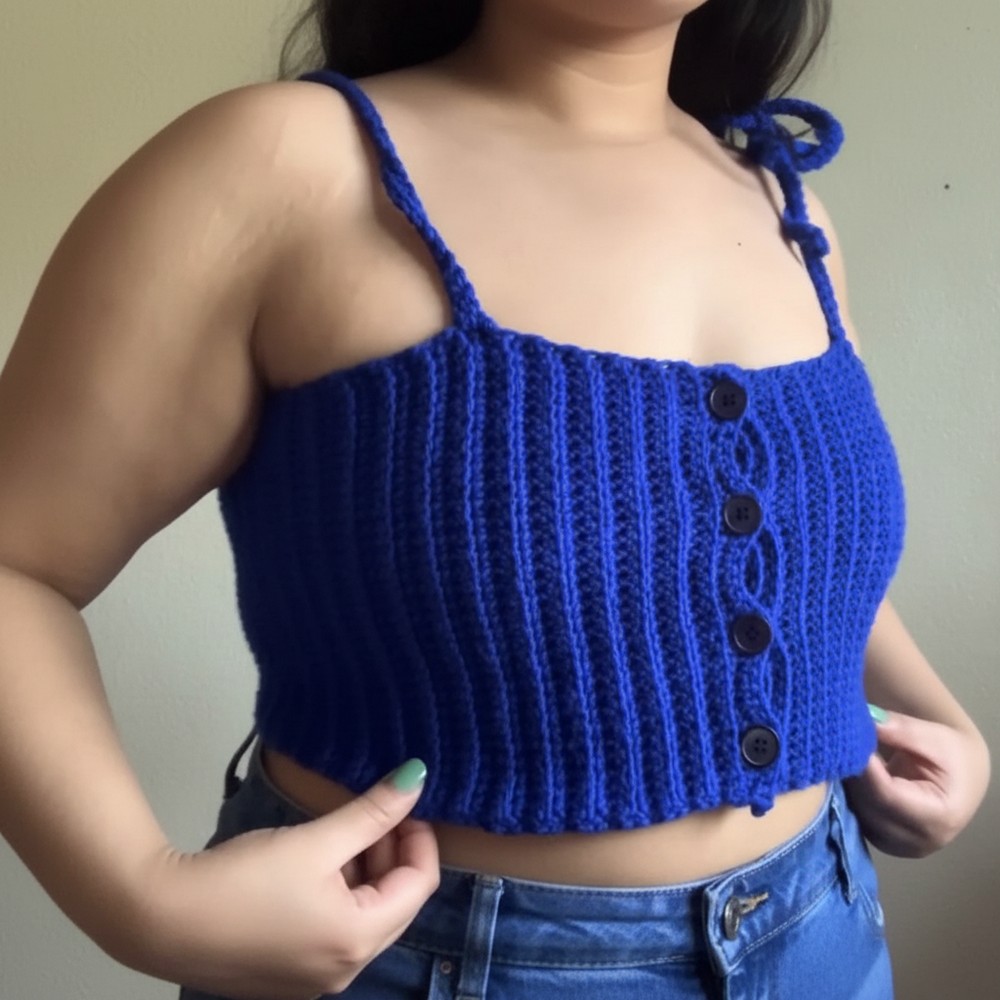
Level up casual fashion with this Free Crochet Ribbed Crop Top Pattern offering a snug shape, stretchy texture, and a clean modern finish.

Smooth Crochet Ribbed Crop Top Pattern Perfect for Everyday Wear
This comfortable and stylish crop top features a soft ribbed design and a close fit that feels great to wear. The stretchy ribbed stitches help the top fit nicely to your body, giving you both comfort and style. It’s easy to match with different clothes—you can wear it by itself on warm days, or layer it under a jacket or sweater when it’s cooler outside. The crochet ribbed crop top pattern is simple and clear, which makes it perfect for beginners and fun for experienced crocheters too.

Its shorter length gives it a modern and playful look, especially when paired with high-waisted jeans, skirts, or shorts. You can easily make this top your own by choosing different yarn colors or adding small touches. Whether you’re going out with friends, relaxing at home, or dressing up for a casual event, this crop top brings a handmade and stylish charm to any outfit.
Materials Needed
-
Yarn: Medium weight (Size 4) yarn (e.g., Big Twist Dark Denim). Approx. 200–300 yards.
-
Hook: 5.0 mm crochet hook.
-
Buttons: 5 buttons (approx. 1-inch diameter).
-
Tools: Thread and needle (for buttons), scissors, and a measuring tape.
Pattern Details
-
Skill Level: Beginner.
-
Stitch Guide: * sc: Single crochet.
-
BLO: Back Loop Only.
-
-
Sizing: The foundation chain determines the length (height) of the top. The number of rows determines the width (circumference).
Phase 1: The Ribbed Body
-
Foundation: Create a slip knot and chain until you reach your desired top length. The tutorial uses 41 chains (approx. 40 stitches).
-
Row 1: Work 1 sc in the 2nd chain from the hook and in each chain across.
-
Row 2 (Ribbing Setup): Chain 1, turn. Work 1 sc in the BLO of every stitch across.
-
Tip: Skip the very first corner stitch and start in the 2nd stitch to keep edges straight.
-
-
Growth: Repeat Row 2 until the piece is wide enough to wrap around your bust comfortably. Do not cut the yarn yet.


Phase 2: Buttons & Buttonholes
Button Placement
-
On the side of the original foundation chain, sew your 5 buttons evenly spaced.
-
Place them in between the “ridges” of the ribbing for a cleaner look.
Creating the Buttonhole Row
-
Preparation: Go back to the side where your yarn is still attached. Chain 1 and turn.
-
Row 1: Work a normal sc (through both loops) down the edge.
-
The Holes: When you reach the position of a button:
-
Chain 2 (or enough to fit your button).
-
Skip 2 stitches (or the same number you chained).
-
Continue with sc until you reach the next button position.
-
-
Test: Slide your buttons through the holes to ensure a secure fit.
-
Finish: Fasten off and weave in the tail on the inside of the garment.


Phase 3: The Straps
Choose between a solid fixed strap or a bow-tie strap.
Strap Placement
Count approx. 10 stitches inward from the button edge to ensure the straps sit comfortably on your shoulders.
Option A: Solid Fixed Strap
-
Attach: Insert hook into the chosen stitch, pull up a loop, and tie a knot to secure.
-
Chain: Chain until the strap reaches the back panel (approx. 55 chains).
-
Join: Attach to the back panel with a slip stitch.
-
Return: Work 1 sc in each chain back to the front to create a sturdy, thick strap.
-
Repeat: Secure on the front piece with a single crochet in the next stitch. Fasten off.
Option B: Bow-Tie Straps (4 pieces)
-
Repeat the “Attach” and “Chain” steps above, but make the chains longer (approx. 70+ chains).
-
Work sc back down the chain and fasten off.
-
Create 4 separate straps (two on the front, two on the back) and tie them in bows over the shoulders.

Conclusion
Once all ends are woven in and buttons are secured, your ribbed top is ready! The vertical ribbing provides excellent stretch, making this a comfortable and stylish staple piece.
Pro Tip: If you find the strap falling off your shoulder, move the attachment point 2 stitches closer to the center of the garment.