Modern Crochet Granny Square Top Pattern Styled for Today

Blend classic charm with this Crochet Granny Square Top Pattern perfect for casual outfits, easy layering, and colorful everyday summer looks.

Handmade Crochet Granny Square Top Pattern Ready for Festivals
Effortlessly blending vintage charm with contemporary flair, a crochet granny square top pattern beautifully showcases the timeless allure of granny squares in a modern, wearable design. This pattern delivers a lightweight, breathable top that flatters various body types and suits all seasons—easy to layer in summer or pair with a jacket during cooler months. Its key benefits include endless customization; you can select colors and sizing for a truly personal piece.

The top serves multiple uses, from casual outings and beach days to festival attire or a unique, thoughtful gift. Its specialty lies in the vibrant motifs, which add intricate texture and rich visual interest, instantly elevating any ensemble. Not only does it beautify everyday looks, but it also radiates individuality and delight with its playful patterns. A crochet granny square top pattern offers unmatched versatility, elegance, and the enduring charm of classic design updated for today.
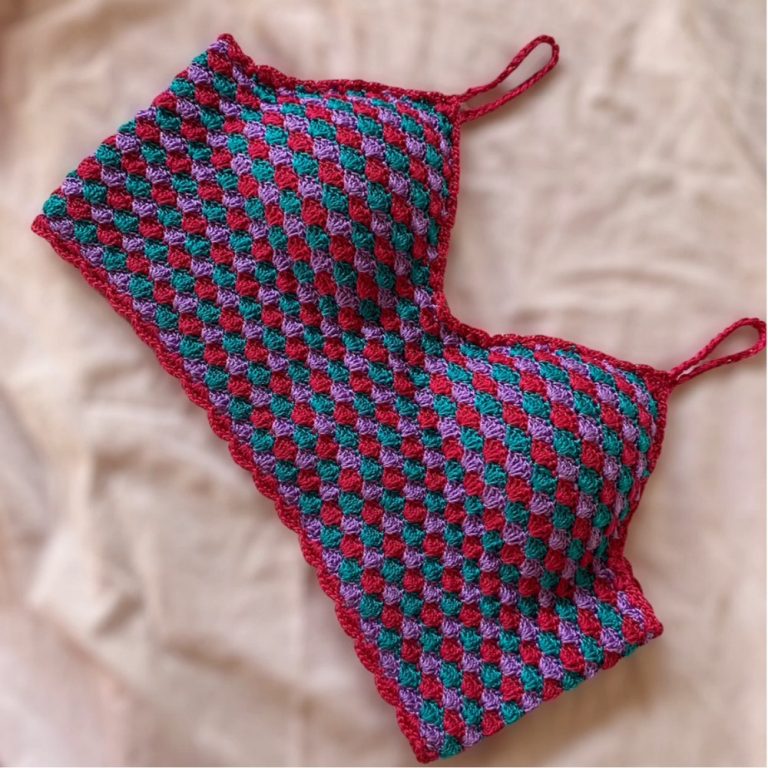
Crochet Granny Square Top Pattern
Materials Needed
- Worsted weight yarn in at least three colors (example: white, tan, and brown). The project works well with scrap yarn or any combination of colors you prefer.
- Crochet hook (size H/5.0mm is typical for worsted weight yarn)
- Scissors
- Yarn needle for weaving in ends
- Stitch markers (optional but very helpful)
Step-by-Step Instructions
1. Make 2 Large Granny Square Panels
Start with the First Color:
- Magic Circle: Make a magic circle. Chain 1 to secure.
- Chain 3: This counts as your first double crochet (dc).
- Work 2 dc into the circle.
- Chain 1.
- Repeat (3 dc, chain 1) three more times into the magic circle until you have 4 clusters of 3 dc, each separated by a chain 1.
- Pull the magic circle closed.
- Slip Stitch into the top of the original chain 3 to complete the round and chain 1 to finish. Cut yarn if changing colors.


Round 2 (Change Color):
- Flip work to the back side.
- Join new color in any chain-1 corner space with a slip knot.
- Chain 3 (counts as dc), work 2 dc in the same space.
- Chain 2 (corner), 3 more dc in the same space.
- Chain 1, move to the next chain-1 space, and repeat (3 dc, chain 2, 3 dc) for each corner, with chain 1 between corners.
- End with a slip stitch into the top of beginning chain 3. Cut yarn & fasten off if changing color.

Round 3 (Change Color):
- Flip to the back; join new color in any chain-1 side space.
- Chain 3, 2 dc in same chain 1 space.
- Chain 1.
- In the corner chain 2 space: 3 dc, chain 2, 3 dc.
- Continue this pattern around: (3 dc, chain 1 in side chain 1 spaces; 3 dc, chain 2, 3 dc in corners).
- End with a slip stitch, chain 1, and cut yarn if changing colors.
Round 4 & Onward:
- For each round, always flip your work so you’re working on the back.
- Continue the pattern: (3 dc, chain 1 in each side chain 1 space; 3 dc, chain 2, 3 dc in each corner).
- Repeat rounds until the square is your desired panel size (size shown fits a women’s small, with the neck hole about 7” wide and arm holes about 8”).
- Make TWO identical panels.

2. Seam Panels for Body (Shoulders & Sides)
Shoulder Seams:
- Lay panels together, right sides facing out.
- Use stitch markers to mark neck opening (approx. 4 double crochet clusters on each side for a 7” neck).
- Starting in the chain 2 corner space, join yarn.
- Slip stitch in front loop of front panel & back loop of back panel, working across to marker. Repeat for other shoulder.
Side Seams:
- Mark armholes (approx. 7 clusters up from bottom, leaving about 8” for arm).
- Join yarn at the seam, slip stitch in front loop of front and back loop of back across to marker.
- Repeat for other side.
3. Add Granny Stripe Sleeves
First Sleeve:
- With right side out, join yarn in any chain-1 space at the armhole.
- Chain 3 (counts as dc); 2 dc in same space.
- Chain 1, 3 dc in next chain-1 space, repeat around.
- At the top of the shoulder where two chain-1 spaces meet, do 2 dc in one, 1 dc in the next, to form a single cluster.
- End with slip stitch in beginning chain 3.
- Change color if desired, chain 1, fasten off, and flip work.
- For subsequent rounds, join new yarn in any chain-1 space, repeat granny stripes pattern (chain 3, 2 dc, chain 1 between clusters).
- Work until you reach your desired sleeve length (sample: 12 rows/rounds for a 7” short sleeve).
Second Sleeve:
- Repeat as for first sleeve.
4. (Optional) Single Crochet Border
- With right side out, join yarn at side seam at bottom of top.
- Chain 1, single crochet evenly around bottom edge, working into each chain/stitch.
- Slip stitch into first single crochet, chain 1, cut yarn, and weave in end.
5. Finishing
- Weave in all ends.
- Try the top on and adjust sleeves or body as needed.
- Optional: Add a single crochet border to the neckline for a more finished look (note: this can make the neck higher).

Sizing Tips
- Adjust square size or seam placements for different sizes.
- Example measurements for small: Neck opening ~7”, Armholes ~8”.
Summary
This top consists of two granny squares seamed at the shoulders and sides, with simple granny stripe sleeves and optional finishing borders. The project is beginner-friendly, quick, and easy to modify for a custom fit.
Special Features:
- Utilizes large granny squares for a modern yet timeless look.
- Modular design lets you fully customize size and color.
- Unique method: flip your work after each round for neater stitches.
- Sleeve construction features seamless granny stripes, making the project cohesive and comfortable.
- Includes tips on using stitch markers for perfect seam placement and fit.
- Optional single crochet edging gives a polished finish to hems and necklines.
- Frequent color changes suggested for a vibrant, personalized effect.
Level of Difficulty:
This project is rated as beginner friendly. The instructor breaks each step down, and the main stitches used are the double crochet, slip stitch, chain, and single crochet—perfect for new crocheters who want to practice essential skills while making a wearable item.
Tutor’s Suggestions:
- Flip your work after every round for tidier edges.
- Use stitch markers to determine the ideal fit for neck and arm openings.
- Customize sizing by adjusting the number of double crochet clusters and rows for your panels and sleeves.
- Choose your favorite color combinations and don’t hesitate to change colors often, especially in the sleeves for added flair.
- Try on your top after seaming to double-check fit before final finishing.
Uses and Materials:
Uses:
The finished sweater top is ideal for casual wear, layering in any season, and makes for a thoughtful handmade gift.
Materials Needed:
- Worsted weight yarn in at least three colors (or more for extra flair)
- Crochet hook (recommended H/5mm)
- Yarn needle for weaving in ends
- Scissors
- Stitch markers (optional but useful)
Tip at the End:
For extra neatness and professional finish, always weave in your ends as you go—this reduces bulk and saves time during your final steps!
Conclusion:
This easy granny square sweater top brings the joy of traditional crochet motifs into a modern, wearable project. With clear instructions and creative freedom in color and sizing, anyone can make a beautiful, comfortable top in just a few hours. The instructor makes each phase approachable for all skill levels, ensuring you can confidently crochet and wear your own creation!