Sporty Crochet Ponytail Hat Pattern for On-the-Go Days
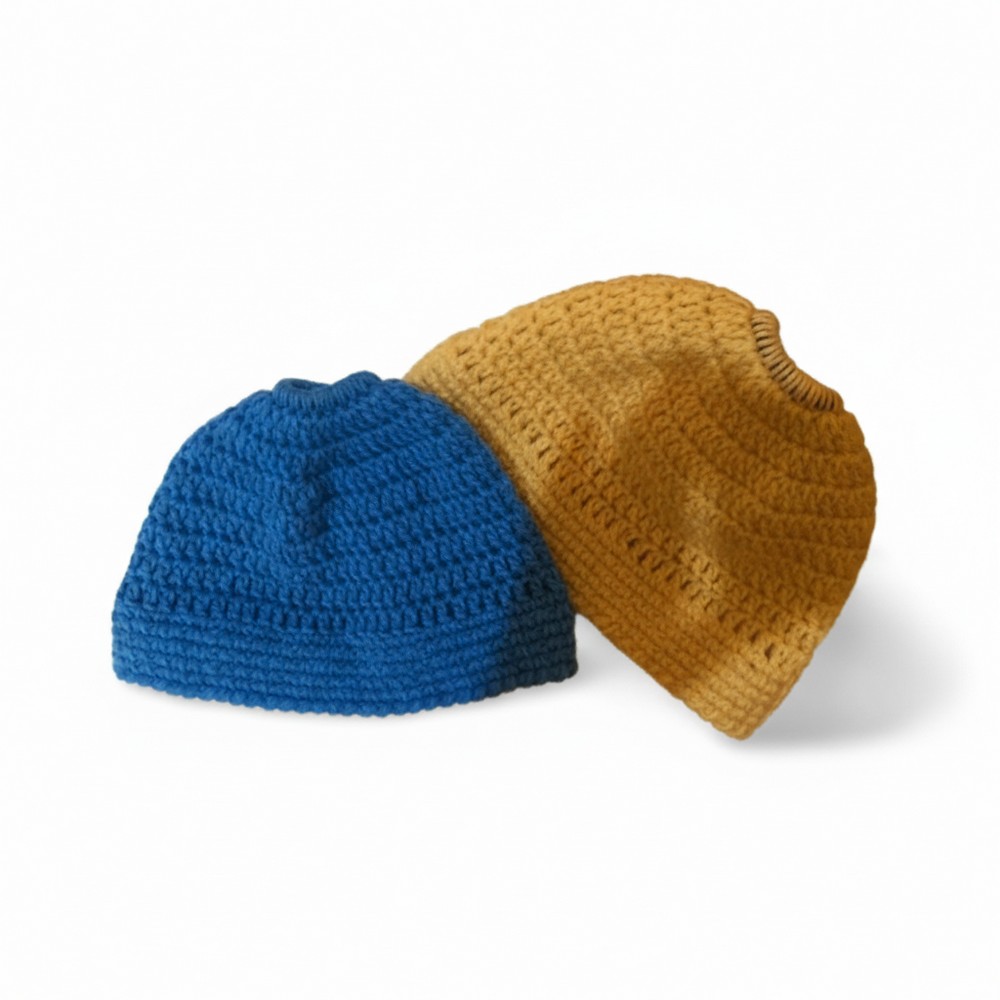
Enjoy stylish warmth this season with a free crochet ponytail hat pattern that lets you keep your hair up while looking effortlessly chic.

Chic Crochet Ponytail Hat Pattern for Effortless Style All Season
Elevating your winter accessories with a fun twist, this charming hat pattern is designed for those who love keeping their hair up without sacrificing style or warmth. A crochet ponytail hat pattern cleverly combines the classic coziness of a beanie with a convenient opening for ponytails, messy buns, or braids, ensuring both comfort and flair. It’s perfect for brisk walks, busy mornings, or outdoor adventures, letting you stay effortlessly neat and polished in any chilly weather.
The snug, textured stitches create a chic and modern silhouette that suits a variety of face shapes and personal styles. Plus, you can easily personalize your hat with vibrant colors, unique buttons, or decorative stitches to reflect your personality. Offering both warmth and versatility, this accessory is a standout addition to any wardrobe, making it a delightful gift or a satisfying project that enhances your collection of handmade winter essentials.
Ponytail Beanie Crochet Pattern (Beginner-Friendly)
Materials:
- Yarn: 100g, 200m, Tex 500 acrylic yarn (e.g., Mollet color 2403, Alice, or Amiga by Circulo).
- 5 mm crochet hook
- Hair elastic (in a color matching your yarn if desired)
- Tapestry needle
- Small scissors
- Textile/fabric glue (optional, for finishing)
- Stitch marker (optional)
Instructions
Foundation: Attaching to the Hair Elastic
- Attach Yarn:
Leave ~15cm of yarn. Slip knot onto your hook, then insert the hook into the center of the hair elastic. - Chain 1, pulling the initial yarn through the elastic.

Round 1: Single Crochet Around the Elastic
- Hold yarn tail and work over it as you crochet around the elastic.
Make 24 single crochets (sc) around the elastic, keeping stitches close together to cover the elastic. - Join: Slip stitch (sl st) to the first sc to close the round.

Round 2: Starting Increases
- Ch 3 (counts as first dc, or double crochet).
- In the same stitch: dc again.
- Next stitch: 1 dc.
- Repeat around:
[2 dc in next stitch, 1 dc in next stitch]
Repeat until you complete the round (total: 36 dc). - Join with a sl st to the top of the starting ch-3.
3: More Increases
- Ch 3, dc in same stitch (first increase).
- Dc in next TWO stitches (1 dc in each).
- Repeat around:
[2 dc in next stitch, 1 dc in next two stitches]
(total: 48 dc by the end). - Close with sl st to the starting ch-3.
Round 4: Even More Increases
- Ch 3, dc in same stitch.
- Dc in next THREE stitches (1 dc each).
- Repeat:
[2 dc in next, 1 dc in next three stitches]
(total: 60 dc). - Close round with sl st.

Rounds 5–9 (or desired height): No Increases
- Ch 3. Dc in each stitch around.
- Repeat for 4-5 more rounds (total of 8-9 rounds from start), until the beanie reaches about 14–15cm height, or your desired length.
- Fewer rows for a shorter hat (covers top of ears).
- More for a longer hat (covers ears completely).

Ribbed Brim (Optional)
- For ribbed effect, alternate the following rounds:Round A: Centered Single Crochet (Low Point/Centralized)
- Instead of under both loops, work your sc into the center of the sc stitch from the prior round (“center single crochet”), creating a knit-like look.
Round B: Slip Stitch Around
- Sl st in each sc around (keep tension loose to avoid puckering).
- Alternate these two rounds for 4-6 rounds for a firm, attractive brim.
Final Round: Crab Stitch (Reverse Single Crochet)
- Crab Stitch:
Working right-to-left (for right-handed crafters), insert your hook into the previous stitch, yarn over, pull up a loop, yarn over, pull through both loops on hook. Repeat all around for a sturdy decorative edge.
Finishing
- Fasten off, leaving a tail.
- Thread tail on tapestry needle, weave in ends or use fabric glue to reinforce and carefully trim excess.
- Check your finish—the ponytail hole at the top should be open and firm.
- Block your hat (optional) for best shape.
Adjust Sizing
- For smaller or larger hats, add or subtract initial stitches on the elastic in multiples of the base increase (usually increments of 6 or 12).
- Adjust the number of rounds for the desired height.
Tips
- Use matching elastic color for a polished look.
- The ribbing with centered single crochet and slip stitches provides nice structure.
- Pattern fit suggestion: ~8 rounds for “short” beanie, 9 for “full” ear coverage.