
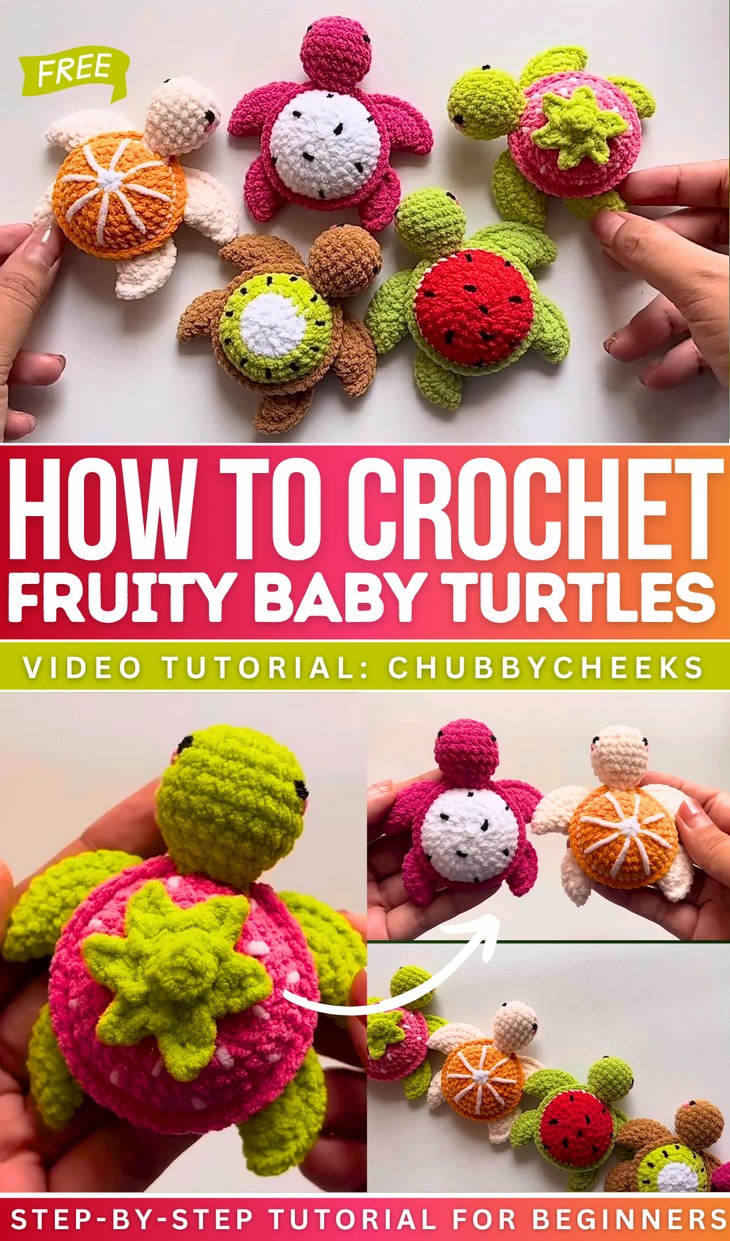
How to Crochet Fruity Baby Turtles for Summer
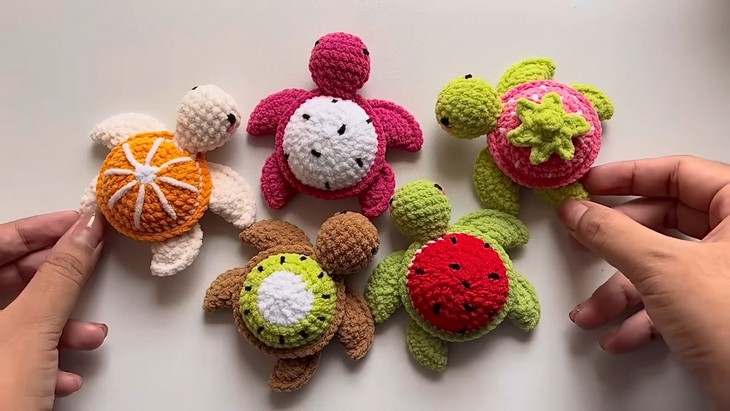
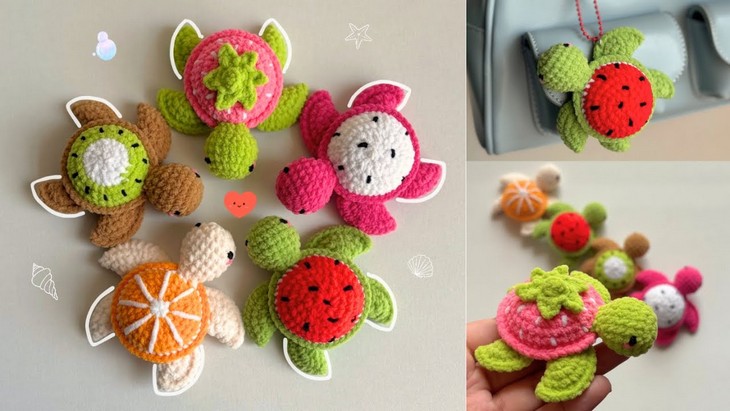
Make your summer special by crocheting 4 fruit-themed baby turtle plushies: kiwi, watermelon, dragon fruit, tangerine, and strawberry turtles. With colorful upper shells and detailed accents such as seeds or wedges, they are perfect for gifting to a dear one. Learn how to crochet these fruity baby turtles with the help of just a single tutorial designed for beginners. Let’s get started!
Skills Used: All turtles begin with a magic ring followed by single crochet (sc) stitches. Increases (2 sc in one stitch) and decreases (sc2tog) are used extensively to shape the body. Color changes and front loop/back loop only stitches help define fruit-specific aesthetics.
Skill Level: Intermediate
Crochet Fruity Baby Turtles Tutorial
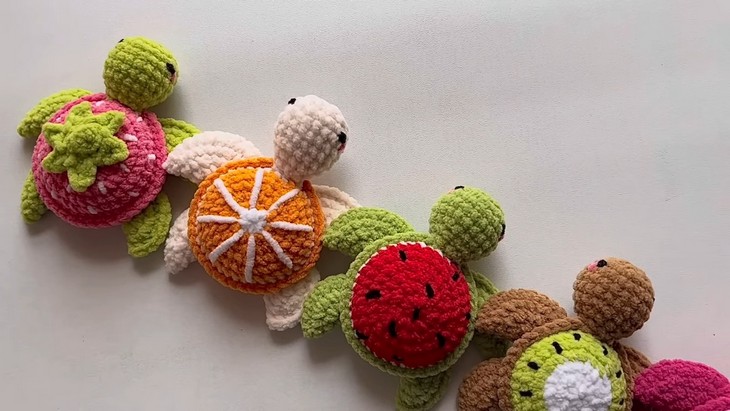
This vibrant tutorial covers five adorable fruity baby turtle amigurumi—watermelon, kiwi, dragon fruit, tangerine, and strawberry—made using soft chenille yarn and a 2.5 mm crochet hook. Each turtle consists of an upper shell, lower shell, fins, head, eyes, blush, and in one case, a leafy stem.
-
Upper Shell Construction and Decoration
Each fruit turtle’s shell begins with a colorful base and then decorative stitching mimicking seeds or wedges is applied. For example, the watermelon gets black yarn seeds stitched on the red shell; the strawberry receives white vertical “seeds”; and the tangerine features white yarn wedges spaced evenly in a circular pattern.
Crochet Fruit Baby Turtle Pattern Collection
Materials List
- Yarn: Chenille (or similar plush) yarn in the following colors:
- Red, Pink, White, Light Peach, Hot Pink, Green, Brown, Orange, Black embroidery/floss or thin yarn, White (for strawberry seeds)
- Adjust colors as needed for specific fruit turtle design
- Crochet Hook: 2.5 mm (for plush look; adjust as needed for your yarn)
- Stuffing: Polyester fiberfill or similar
- Yarn Needle
- Stitch Marker(s)
- Scissors
- Hot glue or strong craft glue (for attaching small parts, optional)
- Measuring tape (optional, to check size)
Key Abbreviations (US Terminology)
| Abbreviation | Meaning |
|---|---|
| MR | Magic ring (adjustable loop) |
| ch | Chain |
| sc | Single crochet |
| inc | Increase (2 sc in the same stitch) |
| dec | Decrease (single crochet 2 together – use front loop only) |
| BLO | Back loop only |
| FLO | Front loop only |
| sl st | Slip stitch |
| st(s) | Stitch(es) |
Special Notes
- Work continuously in spiral rounds unless otherwise indicated.
- Always use a stitch marker to mark the first stitch of each round.
- Color changes: Make color changes on the last pull-through of previous stitch; bring new color through to finish stitch before changing.
- The lower shell is worked into the back loops left from the last round of the upper shell.
- For plush effect, crochet tightly.
Pattern

UPPER SHELL (Make 1 per turtle; color as for specific fruit)
R1: MR, 8 sc into ring (8)
R2: inc in each st around (16)
For Tangerine: change to orange at end of R1.
R3: [sc in next st, inc in next st] x8 (24)
For Kiwi: change to green at end of R3.
R4: [sc in next 2 sts, inc in next st] x8 (32)
R5: sc in each st around (32)
R6: [sc in next 3 sts, inc in next st] x8 (40)
For Watermelon/Dragonfruit/Kiwi/Tangerine: change to white at end of R6 (except Strawberry).
R7: sc in each st around (40)
For Kiwi: change to brown, Dragonfruit to hot pink, Watermelon to green, Tangerine to orange at end of R7.
R8: sc in FLO of each st around (40)
- Sl st in first st, fasten off, and weave in ends.
- Remaining BLO are for attaching the lower shell.
SEEDS/WEDGES Embroidery
- Watermelon/Dragonfruit/Kiwi: Use black yarn for seeds.
- Strawberry: Use white yarn for seeds, place vertically in rows.
- Tangerine: Use white yarn for 8 wedge lines.
(Refer to video for exact embroidery placement. Tie off yarn ends securely.)
LOWER SHELL (All turtles)
- Work with contrasting color (see color list).
- Join to BLO of R8 from upper shell.
R1: Attach yarn to any BLO, ch 1, sc in same st and around (40)
R2: [sc in next 3 sts, dec over next 2 sts (front loops only)] x8 (32)
R3: [sc in next 2 sts, dec over next 2 sts (front loops only)] x8 (24)
R4: [sc in next st, dec over next 2 sts (front loops only)] x8 (16)
- Pause and stuff the body now.
R5: [dec over next 2 sts (front loops only)] x8 (8)
- Fasten off, use a yarn needle to weave tail through the front loops of last round and pull tight to close. Hide ends.
HIND FINS (Make 2, same color as lower shell)
R1: MR, 6 sc (6)
R2: inc in each st around (12)
R3: [sc in next st, inc in next st] x6 (18)
- Closing:
Skip the last st, fold the fin flat, and, working through both thicknesses, sc across (8 sc).
Leave a long tail for sewing and fasten off.
FRONT FINS (Make 2, same color as lower shell)
R1-3: Same as hind fin.
R4: [sc in next 2 sts, inc in next st] x6 (24)
- Closing:
Skip the last st, fold the fin, and sc evenly across through both sides (11 sc).
Leave long tail, fasten off.
HEAD (Upper shell color)
R1: MR, 8 sc (8)
R2: inc in each st (16)
R3: [sc in next 3 sts, inc in next st] x4 (20)
R4–6: sc in each st (20, 3 rounds)
R7: [sc in next 3 sts, dec] x4 (16)
R8: [sc in next 2 sts, dec] x4 (12)
- Stuff head lightly.
R9: [sc in next st, dec] x4 (8)
- Sl st, fasten off, leave long tail for sewing.
ASSEMBLY
- Sew Head: Attach to edge of upper and lower shell, at the round joins.
- Sew Front Fins: Place with “cuff” facing forward, between R1 and R2 of lower shell, about 2 sts from head, sew to shell.
- Sew Hind Fins: Position about 5 stitches behind front fins (adjust for appearance), sew to lower shell.
- Eyes:
- With black yarn, embroider small round eyes between rounds 3 and 4 of head, ~7 stitches apart.
- Blush:
- With pink yarn, embroider a touch under each eye.
- Strawberry Stem: (For strawberry only)
- R1: With green, MR, 6 sc (6)
- R2: BLO, sc in each st (6)
- R3: Ch 3, sc in 2nd ch, hdc in next ch, sl st in next st; repeat for all 6 st.
- Sl st, fasten off, hide tail, and glue or sew to shell center.
Pattern Correction
- Be precise with color changes—always change on the last yarn-over of the previous stitch for crisp color work.
- Always use the correct loop (FLO/BLO) as indicated for best shape and ease of assembly.
- Fin closing: If you find your fin is uneven or not flat, use less stuffing or steam-block after assembly.

Tips
- Work tightly for plush-style toys; use a smaller hook if stitches are gapping.
- Embroidery for seeds and blush can be done before full assembly for easier handling.
- Pin all parts before sewing to check placement and symmetry.
- Customize with different fruit color themes; add extra embroidery for personality or realism.
Conclusion
You’ve now made an irresistibly cute fruit baby turtle plushie! Personalize each turtle for a deliciously adorable collection, perfect for gifting, collecting, or decor. If you enjoyed this pattern, subscribe to the creator and try new color and fruit variations.
Video Guide
https://youtu.be/nzTq9sYE_F8


