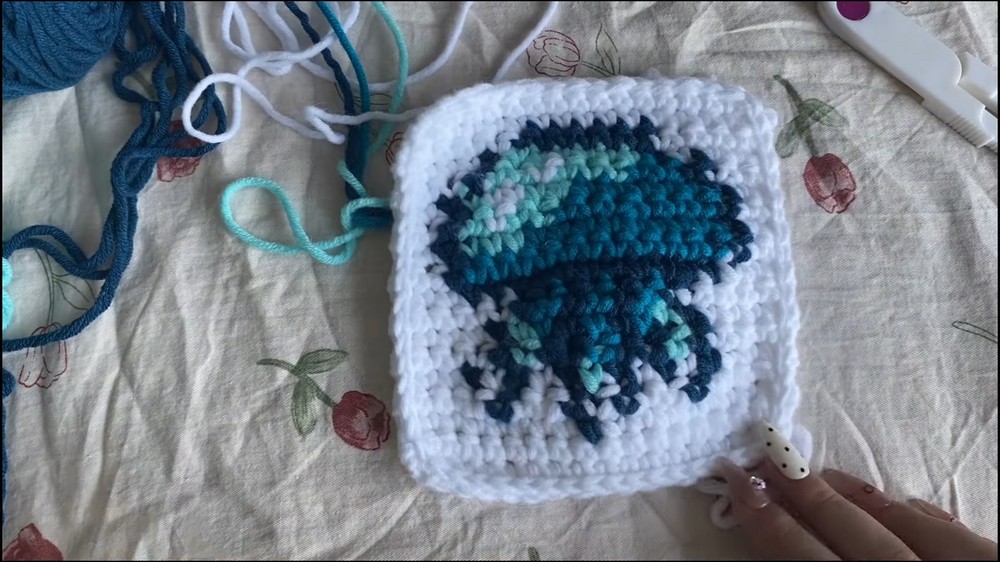
How to Crochet Jellyfish Tapestry Tutorial

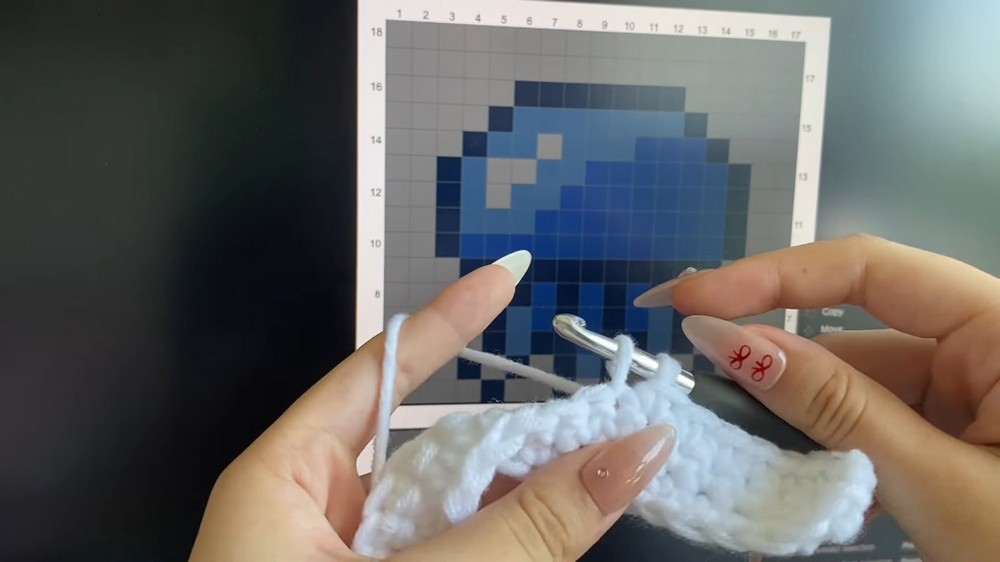
Learn how to crochet a jellyfish tapestry using tapestry crochet techniques, with switching colors seamlessly to achieve a clean design. Beginners are advised to use the free Stitch Fiddle tool for easier navigation of the pattern.
The tutorial emphasizes the importance of working neatly with loose ends and offers tips for framing the piece with a slip-stitched border for a polished finish. Follow through with us for more details about this project!

This video tutorial demonstrates how to crochet a jellyfish tapestry. It covers starting with a chain and working the initial rows in white single crochet. The tutorial then details switching colors to create the jellyfish pattern, emphasizing clean color changes.
It also includes instructions for attaching new yarn and adding a slip stitch border to finish the piece.
Free Crochet Tapestry Jellyfish Pattern
Materials Needed
- Yarn: Four colors of worsted or DK weight yarn (quantity depends on project size)
- Main background color (e.g., white)
- Three contrast/accent colors (e.g., two blues and one accent for jellyfish)
- Hook: 6 mm crochet hook (G/10)
- Scissors
- Tapestry needle (for weaving in ends)
- Optional: Stitch Fiddle pattern grid (link in designer’s video notes or description)
Key Abbreviations & Terms (US Terminology)
| Abbreviation | Meaning |
|---|---|
| ch | Chain |
| sc | Single crochet |
| sl st | Slip stitch |
| st(s) | Stitch(es) |
| RS | Right side |
| WS | Wrong side |
Special Notes:
- The yarn and hook size are interchangeable; use your preference depending on the effect and fabric density you desire.
- Work each row in single crochet.
- Change colors as indicated by the pixel grid.
Pattern
Foundation
- Start with your Main Color (e.g., white).
- Ch 17. (If using a different grid, chain one more than the number of “pixel” stitches per row.)
- Ch 1 more (18 total) for the turning chain.
Row 1
- Work in the back bump of the chain for a neater bottom edge.
- Sc in 2nd ch from hook (skip first turning ch), then sc in each ch across (17 sc).
- Do not count the turning chain as a stitch.
Row 2
- Turn your work.
- Sc in each st across, starting from the first st.
- Do NOT ch 1 at the start of the row—just turn and begin working.
- Rows 1 & 2: Both in main color (e.g., white).
Working the Grid
- From Row 3 onward, follow your pixel/stitch grid.
- Each square = 1 single crochet.
- Change colors as shown in your grid; the color change happens before pulling through the last two loops of the previous stitch, so the new color is on your hook and ready.
- Color Change Method (Single Stitch):
- Before the stitch where the color changes, insert your hook, pull up a loop in the current color.
- Finish the sc with your new color (by yarning over and pulling through both loops with the new color).
- Always keep all tail ends to the same side (WS) so that the front of your work looks neat.
- Do not pull color changes too tightly—allow a little slack.

Continue in single crochet, following the grid row by row:
- For each color switch within a row, use the color change method.
- Follow the chart left-to-right or right-to-left, depending on your row and whether working the RS or WS.
- Do not cut yarn at every color change unless it’s only a single isolated square. You can carry the yarn between nearby pixels by holding it along the row and crocheting over it (tapestry technique).
Adding a New Color
- When your grid/pattern introduces a new color not previously used in the row:
- Drop the old color to the WS, hold the new yarn behind the work, pull through the new color loop to finish the color-change stitch.
- Continue as instructed.
PSA / TIPS
- Ends/Back: All color change ends should be on the back (WS) to keep the front neat.
- Bulkiness: The start (rows with frequent color changes) may appear bulky—this will flatten when more rows are added.
- Orientation: The pixel pattern is not always symmetrical; make sure you are reading the grid in the correct direction after every turn.
- No turning chain: Since stitches are worked in the bump and as sc, the edges will remain straight without adding extra chains.
Finishing Off
- Once your grid is completed:
- Ch 1, pull tight.
- Cut the yarn (leave a moderate tail).
- Weave in all tails on the back (optional if decorative; necessary if frequent handling/washing).
- Some crafters choose to trim and leave tapestry ends unworked if the piece will be mounted or not handled.
OPTIONAL – Slip Stitch Border
- Switch to a hook 1 mm smaller (e.g., 5 mm).
- Join main color yarn at any corner by pulling up a loop.
- Slip stitch evenly around:
- Work 1 sl st into each row down the sides, along the top and bottom, and 1 sl st into the corners to round them out.
- At each corner, work 2 sl st to help the piece lay flat.
- When finished, cut a tail, draw through last loop, and weave in all ends.
Conclusion
With this technique, you have created a custom pixel art tapestry crochet square, perfect as decor, a patch, or as a panel for a bag or a pillow. The process trains colorwork skills and gives creative freedom with any pixel grid. Practice neat, consistent stitches and relaxed tension for best results.
Pattern Corrections & Tips
Correction:
- Always remember: turn your work at the start of each row; do not add an extra ch unless you want a raised edge.
- Use the back bump of chain for the foundation for a neater start.
Pro Tips:
- Carry unused yarn along the row if color switches are frequent and the carried strand won’t show through (tapestry crochet).
- Leave all ends on one side for easy finishing.
- Always double-check your color placement against the grid before changing colors.
- If the beginning seems dense/bulky, gently tug the sides or block the finished piece.