Easy & Free Crochet Clutch Bag Pattern – Step-by-Step Tutorial

Add a personal touch to your accessories with a free crochet clutch bag pattern that’s easy to follow and perfect for gifting or everyday use.
Finding a stylish and practical bag that fits just the essentials can be a challenge. The free crochet clutch bag pattern shared by the talented team behind Вязание с Мариной Метель offers a perfect solution. This compact accessory is designed to hold your phone, keys, and small personal items securely, while adding a touch of elegance to any outfit.
How to Crochet Adorable Clutch Bag – Free Pattern
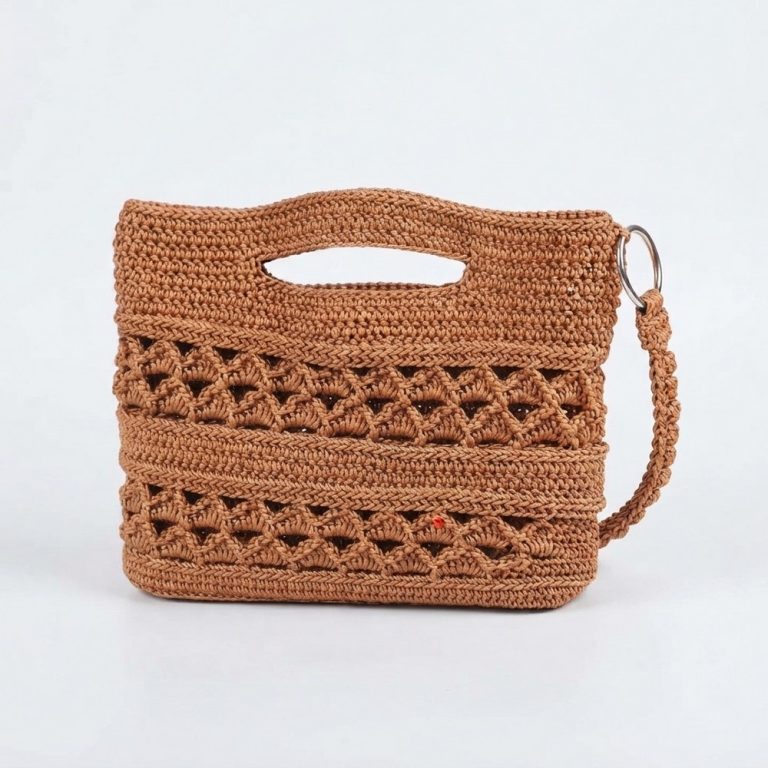
This project features a rectangular shape with a neat flap, creating a timeless and refined look. The textured pattern, made with loops and bars, adds depth and interest, giving the clutch a slightly raised, tactile surface that feels lovely to the touch. The reversible design means you can flip it inside out for a fresh look, making it versatile without extra effort.

With dimensions around 24 by 14 cm, the clutch strikes a balance between portability and enough space for essentials. It includes thoughtful details like a magnetic clasp and a chain strap, enhancing both style and function. The use of sturdy cord ensures durability while keeping the overall weight light, ideal for everyday use or special occasions.
Beyond its practical benefits, this clutch stands out as a beautiful gift idea, perfect for anyone who appreciates charming and useful accessories. The attention to finishing touches—such as hidden ends and a carefully steamed fabric—gives the bag a polished, professional feel, elevating its decorative value and making it a truly special creation.

Stylish Crochet Clutch Bag Pattern
This pattern guides you through creating a stylish clutch bag featuring a modern textured design and sleek edges. The bag is practical for both casual and formal occasions, with added hardware for a chain strap and magnetic clasp for functionality. Its structured shape and elegant texture make it a timeless accessory for handmade enthusiasts.
Skill Level
Intermediate
This pattern is suitable for crocheters who can follow textures, work clean edges, and assemble panels. Familiarity with attaching hardware (magnetic snaps and rings) is also required for finishing the bag.
Materials
- Cord/Yarn: Black cord (3 mm diameter) or any durable, non-stretch fiber for stiffness and durability.
- Crochet Hooks:
- 4 mm: Used for the main clutch body.
- 3 mm: Used for edging to create a crisp finish.
- Hardware and Tools:
- Scissors.
- Lighter (to singe cord ends and prevent fraying).
- Magnetic clasp.
- Two carabiner rings (4.5 cm diameter).
- Chain strap (120 cm).
- Blocking Tools: Iron or steamer and a damp cloth for shaping the clutch.
Special Stitches
This clutch bag features the following crochet techniques:
- Single Crochet (SC): Used for the body and edges.
- Modified Single Crochet (Textured): Insert the hook through the back bump and front loop of the previous row’s stitch while leaving the back loop unworked to create a raised linear texture.
- Slip Stitch (SL ST): Used to join the panels and create a neat finish along the edged sections.
Stitch Abbreviations
| Abbreviation | Meaning |
|---|---|
| ch | Chain |
| sc | Single Crochet |
| sl st | Slip Stitch |
| BLO | Back Loop Only |
Useful Tips
- Blocking: Steam-block the clutch body once crocheted for a clean, soft, and even look. Lay it flat and ensure edges line up perfectly before the steam treatment.
- Consistent tension: Ensure a tight tension to prevent holes or uneven sections.
- Applying hardware: Use a magnetic clasp and carabiner rings carefully; mark exact positions to maintain symmetry.
- Mark stitch locations: Use pins, markers, or contrasting yarn to separate sections for accuracy while crocheting panels.
- Singe cord ends: Lightly singe the cord ends to prevent fraying and give the bag a professional look.
Pattern Instructions
1. Main Body
The body of the clutch is worked as a flat rectangular panel measuring 52 rows with 26 stitches per row.
Starting
- Make a slip knot, leaving a tail for securing.
- Ch 26 stitches to create the foundation chain.
Row 1 (Foundation Row)
- Ch 1 (turning chain), skip the first chain.
- Using the back bumps of the foundation chain: Work 26 sc across evenly.

Row 2 (Establishing the Texture)
- Ch 1, turn your work.
- Work 26 sc evenly, inserting the hook through the back bump and front loop only, leaving the back loop unworked.
Rows 3–52
- Continue repeating the pattern established in Row 2 for a total of 52 rows.
- Fasten off, leaving a long tail for assembly.

Blocking
- Lay the flat panel on a surface with the wrong side facing up.
- Place a damp cloth on top and steam it using an iron or steamer. Flatten the edges evenly into a rectangular shape. Allow the blocked piece to dry completely before continuing.
2. Marking and Edging
Marking the Sections
With the right side facing up:
- Mark the first side panel using 17 stitches along one edge (height of the bag).
- Skip 3 stitches in the center to define the bottom section.
- Mark another 17 stitches for the second side panel along the opposite edge.

Edging
Using the 3 mm hook:
- Attach cord to the edge and work sc stitches along the edges of the rows (one stitch per row).
- Along the bottom foundation edge, work sl sts evenly to create a tighter and more polished look.
3. Side Panels
First Side Panel
- Row 1: Identify the first marked section of 17 stitches.
- Pull up a loop, make a turning ch, and work 17 sc evenly across.
- Row 2–3:
- Turn your work at the end of each row.
- Skip the first stitch of the base on Row 3 and join to the next stitch, then complete 17 sc.
- Joining:
- Use sl sts to carefully join the side panel to the main body by catching back loops for a seamless assembly.
- Fasten off, singe and secure the end.

Second Side Panel
Repeat the same steps as the first side panel, working from the second marked section. Join to the main body with slip stitches.

4. Attaching Hardware
Magnetic Snap
- Attach a magnetic clasp to the inside of the flap ensuring proper alignment with the matching point on the bag body.
Carabiner Rings and Chain Strap
- Attach one carabiner ring to each side of the clutch at the bag openings.
- Clip the 120 cm chain strap onto the rings.
Final Finishing
Lightly steam the bag again to smooth edges and ensure consistent shape. Adjust the chain length and hardware for precise placement.

Final Product
This stylish crochet clutch bag blends functionality with a clean, modern design. Featuring a timeless textured pattern and hardware detailing, this accessory is perfect for any occasion. With careful attention to assembly and finishing, this clutch showcases the artistry of handmade craftsmanship.