Smart Crochet cropped top Pattern for Trendy Wardrobe

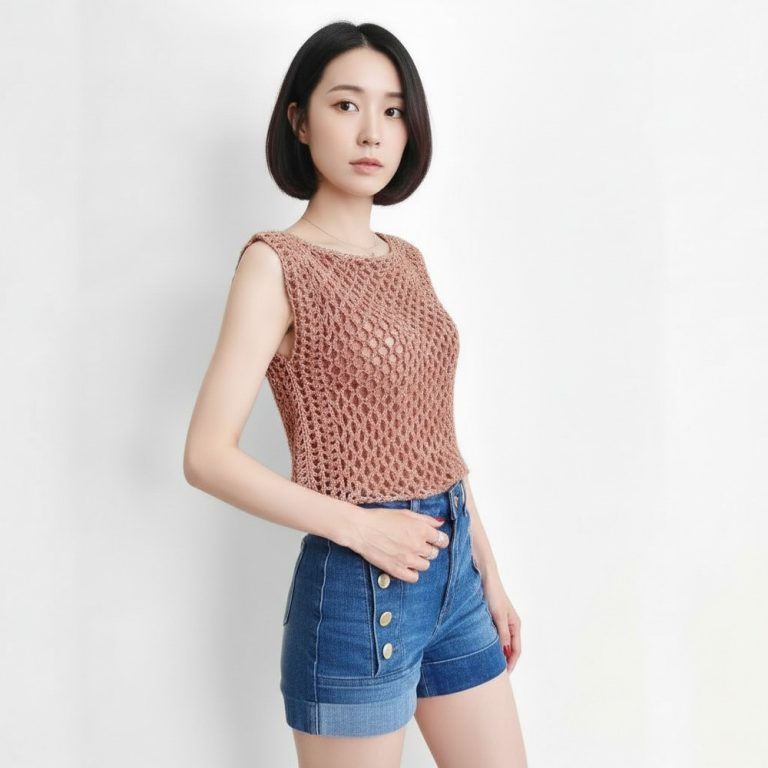
Enjoy sunny vibes with Crochet cropped top Pattern that forms a cute, comfy piece for warm days, casual outings, and effortless trendy looks.
Want a stylish piece that feels personal and comfortable? A Crochet cropped top Pattern is loved because it lets you tailor every detail, including shape, length, and style, so the fit matches your body and taste perfectly. People choose it since crochet creates a light, airy garment that stays cool in warm weather while still looking chic. It outperforms many store-bought options because you can adjust sizing, choose yarn, and add unique accents, making each piece truly one-of-a-kind.

Light Crochet cropped top Pattern for Breezy Comfort
Its charm comes from the raised textures, stitch patterns, and handmade feel that add depth and elegance to simple outfits. This top fits well for beach days, casual hangouts, summer parties, and creative photoshoots. It also looks great with high-waisted skirts or layered under cardigans for a trendy layered look. Overall, it combines comfort, creativity, and style, making it a smart addition to any modern closet.

Introduction
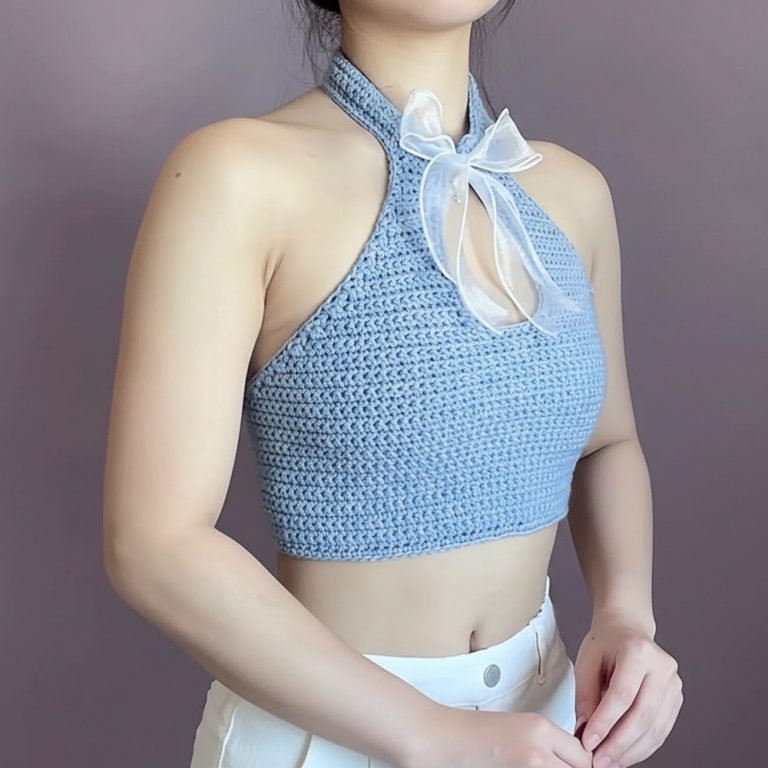
In this tutorial, Bia Crochet teaches how to make a Ribbed Band Top with a Round Neckline. This project is a fantastic entry point for beginners because it uses very few stitch types and follows a straightforward vertical construction. The result is a trendy, elastic, and highly adjustable cropped top that can be styled in multiple ways.
Materials
-
Yarn: Charme or Anne (The tutor uses Charme with a double strand—one thread from the inside and one from the outside of the skein). [00:30]
-
Hook: 3.0 mm. [00:24]
-
General Tools: Scissors and a measuring tape.
Special Features
-
Vertical Construction: Unlike traditional tops made in horizontal rows, this is made as a long vertical band that wraps around the body. [00:45]
-
Elastic Ribbed Texture: By working in the back loops only, the fabric becomes stretchy and comfortable, mimicking a knit look. [03:51]
-
Adjustable Front Cinch: The top features a central cord that threads through eyelets, allowing you to create a “scrunch” effect or a round neckline. [11:49]
-
4-in-1 Styling: Depending on how you tie the straps (halter, criss-cross, etc.), the look of the top changes completely. [12:32]
Level of Difficulty
Beginner. This is an excellent project for practicing basic stitches like the half double crochet and the back-loop-only technique. [06:07]
Detailed Pattern & Stitches
1. The Foundation (Vertical Height)
-
Start with a cord of chains that equals the height of your bust (from the top of the chest to the bottom of the ribcage). Check the tutorial description for P, M, and G measurements. [00:37]
-
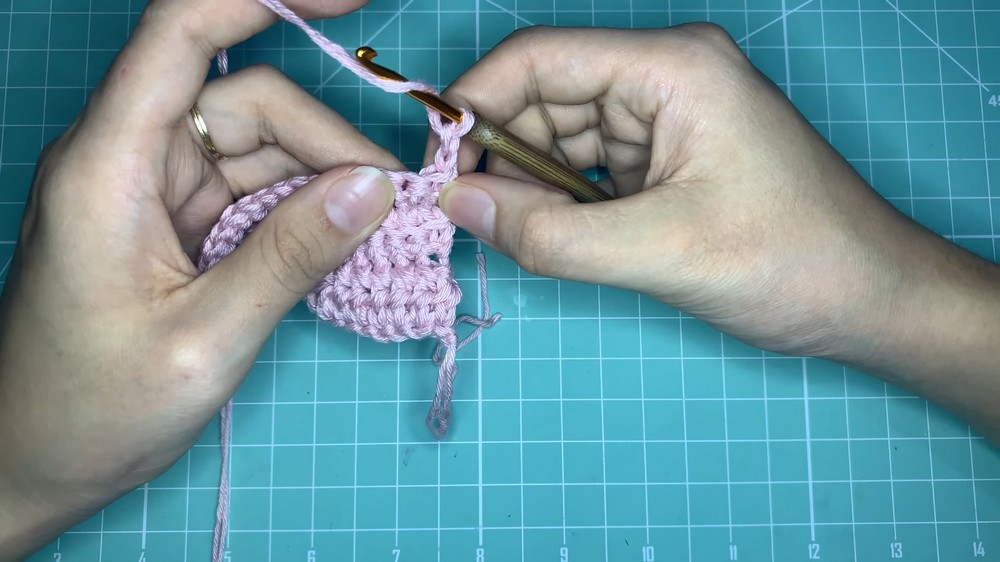
Row 1 (Eyelet Row): Chain 2 (counts as 1 Half Double Crochet). Skip 3 chains, and in the 4th chain, work a Half Double Crochet (HDC). Work 1 HDC into every chain across. [01:07]
-
Note: This HDC row creates the gaps needed to thread the strap later. [02:03]
-

2. The Ribbed Body
-
Row 2: Chain 1, turn. Work one Single Crochet (SC) into every stitch across. [02:10]
-
Row 3 and onwards: Chain 1, turn. Work one Single Crochet into the BACK LOOP ONLY (BLO) of every stitch. [03:35]
-
Repetition: Continue repeating Row 3 (SC in BLO) until the band is long enough to wrap around your entire bust. The piece will look like a long ribbed rectangle. [05:15]
3. Final Row (Second Eyelet Row)
-
Once the band reaches your bust circumference, finish by making one final row of Half Double Crochets (matching Row 1) to create the second set of eyelets. [06:28]

4. The Triple-Strand Cord
-
Technique: To make a sturdy strap, the tutor uses a “triple strand” method from a single ball: fold the yarn into a loop and pull the main thread through to create a three-ply effect. [08:14]
-
Stitch: Simply create a long chain (approx. 1.2m to 1.5m) using this triple-strand yarn. [08:44]
5. Assembly (Cinching)
-
Lay the band flat. Fold the two short ends (the HDC rows) so they meet in the middle of your chest. [09:40]
-
Use your crochet hook to thread the cord in a “zigzag” or “lacing” pattern through the HDC stitches on both ends. [10:33]
-
Pull the cord tight to “scrunch” the front of the top into a round neckline. [11:31]

Tutor’s Suggestions
-
Yarn Quantity: Since the stitch is quite dense and ribbed, it uses more yarn than a flat stitch. If you are making size M or G, the tutor recommends having more than one skein of yarn ready. [12:27]
-
Fit: Because the stitch is elastic, make sure the band is snug but not overly tight before finishing, as it will stretch with wear. [05:29]
Uses
-
Casual Summer Wear: Perfect for beach days or hot afternoons.
-
Versatile Styling: The long straps allow you to tie the top in several ways, making it feel like a different outfit every time.
Conclusion
The Ribbed Band Top is a minimalist yet effective design that showcases how a single technique (back loop crochet) can create a professional-looking garment. Its adjustability makes it a great gift or a reliable staple in your own handmade wardrobe.
Tip: When working the SC in the back loop, be careful not to miss the very last stitch of the row, which often “hides” or slants downward. If you miss it, your top will slowly become a triangle instead of a rectangle! [02:49]