Modern Crescent Bag Free Crochet Pattern

Say Thanks & Support: Вязание с Мариной Метель
Upgrade your collection with this free crochet crescent bag pattern and enjoy its versatility as a chic, functional companion for any occasion.
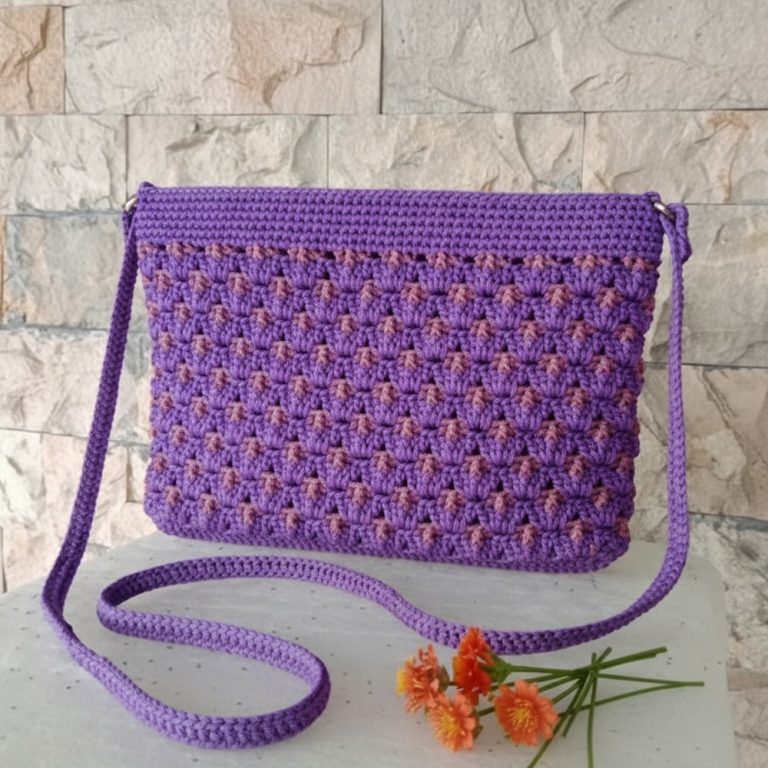
The Free crochet rescent Bag Pattern is a fantastic project for anyone who loves combining creativity with practicality. This thoughtfully designed crochet bag is not only an eye-catching accessory but also a functional item you’ll love using every day. Whether you’re looking to make something for yourself or create a handmade gift with a personal touch, this pattern is an excellent choice.
The bag’s crescent shape gives it an elegant, modern appearance, while its textured pattern adds depth and visual interest. It’s lightweight yet sturdy, making it perfect for carrying small essentials like a wallet, phone, or even your crocheting supplies. Versatile in style, this bag pairs beautifully with casual outfits or even a chic evening look. Whether for daily errands or special occasions, it’s sure to stand out with its unique design.

Free Crochet Crescent Bag Pattern for Daily Use
Simple yet impactful, this project is a delight for beginners and experienced crocheters alike. The helpful tutorial by Вязание с Мариной Метель ensures clear guidance, making the process easy to follow and rewarding.
Explore the Free crochet rescent Bag Pattern today to create a bag that’s as functional as it is stylish. It’s a perfect blend of beauty and utility, designed to bring joy to both the maker and the user!

Crochet “Banana” Crescent Bag Pattern – Detailed Step-by-Step Guide
This crochet tutorial guides you in creating a stylish and trendy “banana” or crescent-shaped bag. The bag features a curved base, sculpted by strategic stitch increases, a durable side gusset, and a zippered top closure. Constructed with a medium-thick 5 mm cord and a combination of hook sizes, the bag boasts both texture and structure, perfect as a fashionable everyday accessory. This detailed written pattern breaks down every stage, from foundation to finishing touches, in clear, beginner-friendly language.
Quick Overview of Pattern
- Start with a foundation row of 42 stitches to form the base shaped in a crescent curve.
- Work the main body in rows, carefully increasing stitches at the sides while maintaining a fixed center section to create the signature curved structure.
- Utilize stitch markers to mark the middle 14 stitches and alternate rows between face and back to enhance texture.
- After completing two main halves, finish the top edge neatly with a final row.
- Attach a zipper securely to the opening.
- Construct and join a side panel (gusset) for depth and finishing.
- Crochet a handle by chaining desired length and working 3 rows of single crochet.
Notes
- The creator uses back loops or specific loops in stitches for texture—pay attention to this as it affects the bag’s unique surface.
- Alternating work on the front and back side of the fabric improves firmness and aesthetic appeal.
- Stitch markers are essential to consistently mark the central 14-stitch section through shaping.
- Securing and melting cord ends after finishing is important to prevent fraying.
- The gusset adds volume and structure, making the bag practical and sturdy.
- The handle length can be customized to your preference.
Skill Level
Intermediate — Suitable for crocheters familiar with:
- Foundation chains and basic crochet stitches
- Increasing stitches in rows for shaping
- Working in both front and back loops
- Adding zipper and sewn components
- Joining pieces with slip stitches
- Creating consistent tension for structural items
Materials
- Cord Yarn: Approximately 400 meters of 5 mm thickness cord yarn
- Crochet Hooks: Size #7 (4.5 mm) and #6 (4 mm) as needed
- Zipper: One zipper matching bag opening width
- Accessories:
- 2 Carabiner rings
- Needle and thread for sewing zipper
- Scissors
- Lighter (to secure cord ends)
Measurements / Sizing
- Foundation row: 42 stitches wide
- Center section: Fixed 14 stitches marked for shaping
- Bag depth defined by gusset (approximate 9 rows width)
- Handle chain length customizable (100 chains in tutorial example)
- Finished crescent bag size suitable for everyday essentials
Gauge and Stitch Pattern
- Gauge depends on cord thickness and hook size; tension should be balanced to maintain structural integrity without stiffness.
- Alternating work between front and back sides, with back loop or specific loop techniques, creates textured fabric contributing to the bag’s unique appearance.
- Stitches used: single crochet (sc) and slip stitch (sl st) for joining.
Stitch Abbreviations
| Abbreviation | Stitch | Description |
|---|---|---|
| ch | Chain | Basic foundation stitch |
| sc | Single Crochet | Compact stitch forming firm fabric |
| sl st | Slip Stitch | Joining stitches seamlessly |
Special Techniques
Back Loop and Specific Loop Stitches
- Working into back loops or specific loops (such as front loops or post stitches) creates texture and depth.
Strategic Increases for Shaping
- Increases placed gradually on sides near central stitch markers sculpt the crescent shape.
The Crochet Pattern!
Step 1: Base Foundation
- Using size #7 hook, chain 42 stitches for the foundation row, establishing a broad base for the crescent shape.
- This base will form the bottom curve of the bag.

Step 2: Main Body Construction
General Instructions:
- Mark the central 14 stitches with stitch markers throughout the body construction.
- Work rows alternating the front side (right side) and back side (wrong side), ensuring texture develops.
- Focus on increasing stitches near the edges, especially adjacent to the central marked section, to sculpt the crescent curve.
- The central 14 stitches remain consistent, while the side stitch count gradually changes.

Details:
- Begin by working single crochet (sc) stitches across the row of 42 stitches.
- On subsequent rows:
- Increase on sides by adding stitches in specified loops (back loops or defined loops) to widen your rows beyond the foundation.
- Work into back loops/specific loops as per pattern for texture.
- Use stitch markers to measure and maintain the consistent 14 stitches in the center.
- Continue systematically enlarging the width near the sides while maintaining the center block through approximately 32 minutes of work (as per video).
- By the end of this step, two main halves of the bag that create the crescent shape are formed.

Step 3: Edging and Finishing Top Edge
- Once both halves are complete, crochet a finishing row of 42 stitches evenly across the top edge for a clean border.
- Secure your yarn tail carefully using scissors and a lighter to seal.
Step 4: Zipper & Assembly
Attaching the Zipper:
- Using needle and matching thread, sew the zipper securely onto the bag opening, ensuring alignment and smooth operation.
Gusset / Side Panel:
- Using the crochet hook, create a gusset strip approximately 9 rows in length.
- Once gusset length is achieved, join it to the bag sides with slip stitches (sl st), shaping the bag’s depth and giving volume to the crescent form.

Step 5: Handle Construction
- Chain the desired handle length; video example uses 100 chains.
- Work 3 rows of single crochet (sc) across the chained foundation to form a sturdy handle.
- Attach the handle securely to the carabiner rings on the bag.


Assembly & Finished Size
- The finished bag has a smooth crescent-shaped body with a strong base, thanks to systematic increases on the sides.
- The gusset provides ample depth, making the bag spacious and well-shaped.
- A robust zipper closure ensures security and easy access.
- Handle length is customizable for shoulder or casual carry preferences.
- Final dimensions depend on tension and yarn but suit everyday carry needs.

Conclusion
This crescent “banana” bag crochet pattern blends fundamental crochet techniques with strategic shaping and assembly for a functional and attractive accessory. By mastering stitch placement, increases, and working between front and back sides, you achieve a textured, curved form unique to this style. The addition of a zippered opening and gusset enhances usability and structure, while the handle offers comfort and style. Whether for personal use or gifting, this project encourages skill development and creativity in crochet construction.