How to Crochet a Spiral Peppermint Coaster for Christmas & Other Festivals

Learn how to crochet a spiral peppermint coaster to decorate your Christmas dining table with a step-by-step tutorial from Cute Crochet. This coaster project will be excellent for learning the spiral technique and changing the colors in the spiral making it perfect for beginners. Once you understand the basic pattern, crocheting this spiral coaster in any size will become a breeze.
Since it is square-shaped, you can also crochet many coasters and join them to form a large project like a blanket. The complete guide for crocheting this spiral peppermint coaster will be available at the end of this post!

Skills Used: Making a magic circle, working single, half-double, and double crochet stitches, and increasing stitches to form a spiral pattern. It also highlights how to work with multiple yarn colors simultaneously, managing color changes seamlessly. Additional skills include tapering edges for a polished finish and weaving in loose ends neatly.
Personalization Tips: You can try colors like green, blue, and red for the 4th of July and orange for Thanksgiving instead of red. You can also adjust the size by adding or reducing rounds to create items like placemats, cushions, or larger decorative pieces.
Crocheting a Spiral Peppermint Coaster is perfect for any festival with simple color customization. This coaster, can be made using four different skeins of yarn, ideally in festive colors. It’s versatile as you can crochet it into anything. Suggests detangling the yarn after each round to avoid a mess.
Crochet Spiral Peppermint Coaster Pattern
Materials
- Yarn: Four different skeins of 4-ply (category 3, DK/light worsted) cotton yarn
(You can use any four colors. If you don’t have multiple skeins, separate each color into a smaller ball.) - Hook: 4.0 mm (US G-6) crochet hook
- Notions:
- Stitch marker (or alternative like a paper clip or contrasting yarn)
- Yarn/tapestry needle for weaving in ends
- Scissors
- Optional: Blocking materials (for a neater finish)

Abbreviations (US Terms)
| Abbreviation | Meaning |
|---|---|
| ch | chain |
| sc | single crochet |
| hdc | half double crochet |
| dc | double crochet |
| sl st | slip stitch |
| st | stitch |
| sp | space |
| inc | increase (2 stitches in one) |
| MC | magic circle/loop |
Special Notes
- The pattern is worked in four spiral sections at once, carrying all four yarn colors throughout.
- “Increase” means to place 2 stitches in the same stitch.
- Always move on to the next color section after completing stitches for your current color.
- Use the stitch marker to indicate the end of each round – vital for spiral rounds!
Pattern
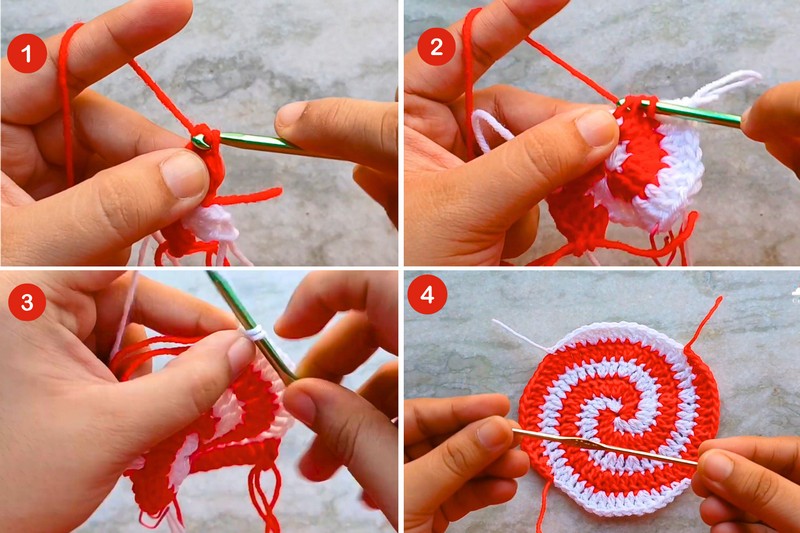
Round 1:
Start with your first color.
- Make a Magic Circle (MC).
- Ch 1 (does NOT count as a stitch).
- Into the magic circle, work the following in order:
- sc (single crochet)
- hdc (half double crochet)
- dc (double crochet)
- Pull up a long loop, remove hook.
Repeat steps 2–4 for remaining three colors (use a slip stitch in the magic circle to join each new color, ch 1 to begin, then work sc, hdc, dc as above with each new color).
Tighten the magic circle, cinching the center closed.
Round 2:
With each color section in turn:
- Skip the ch 1.
- In each of the three stitches (sc, hdc, dc) of the next section, work 2 dc in each st—6 dc per section.
- Drop the yarn after finishing each section; repeat for all colors around.
Tip: Detangle your yarn after each round to avoid knots.
Round 3:
With each color section in turn:
- Work into the 6 stitches of the next section as follows:
- dc in first st
- 2 dc (inc) in next st
- Repeat above steps 2 more times (alternating dc and inc):
- dc in 3rd st, 2 dc in 4th st, dc in 5th st, 2 dc in 6th st
- You should have 9 stitches per section at the end of this round.
Round 4:
For each section, work into the 9 stitches of the next section:
- dc in next 2 sts
- 2 dc in next st (inc)
- Repeat this sequence two more times:
- dc in next 2 sts,
- 2 dc in next st (each section increases to 12 sts)
Round 5:
For each section, into the 12 stitches of the next section:
- dc in next 3 sts
- 2 dc in 4th st (inc)
- Repeat sequence two more times:
- dc in next 3 sts, 2 dc in next st
- (total: 15 stitches per section)
To increase the size, continue in this pattern: for each new round, add one more dc before each inc.
Edging and Tapering (Finishing Round):
For each section:
- dc in first st
- hdc in next st
- sc in next st
- sl st in next st
- ch 1, fasten off, leaving a tail
Repeat for each section.
Weaving in Ends:
- Using a yarn/tapestry needle, weave yarn tails under stitches of the same color, both at center and outer edge.

Pattern Correction
- Always skip the beginning ch 1 of each section; this ch 1 does NOT count as a stitch.
- Make sure to only work into the stitches of the next color section in sequence.
- Use a stitch marker to reliably track the end of each round.
Tips
- Handle all your active working yarns gently to prevent tangling. Periodically detangle as you move from section to section.
- Adjust the number of rounds for your preferred coaster, placemat, or cushion size.
- For crisp edges and perfect circles, block your finished piece lightly with steam or pins.
Conclusion
This Spiral Peppermint Coaster brings a delightful pop of color to your festive table. With a neat spiral effect and easy-to-memorize increases, you can adapt this pattern for various projects—coasters, placemats, potholders, or decorative cushions.