How to Crochet Chunky Baby Bunny (Pattern For Beginners)
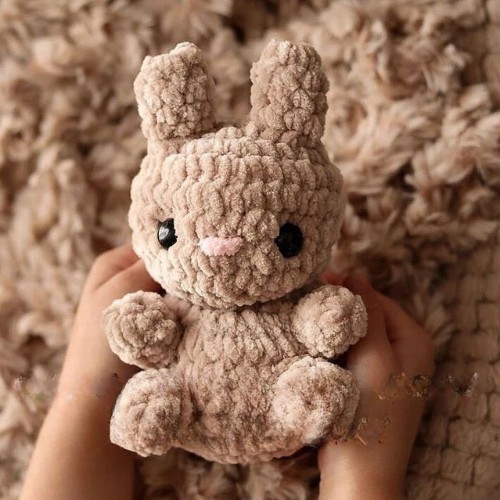
Learn how to crochet this chunky baby bunny amigurumi using velvety yarn that gives it super shine and softness. Make it an oh-so-cute nursery boy/girl’s gift. The pattern for this crocheted bunny is basic, which is perfect for beginners. You will not need to ruin your mind by creating complex details while getting a chance to increase the toy collection of your bundle of joy. Let’s dive into details about this pattern.
Designer: loopswithlauren on Instagram
Abbreviations and techniques
This baby bunny amigurumi pattern has been written using abbreviations instead of full names but needs the basic amigurumi skill you can learn from the links below. Check out the meaning for each:
- SC – Single Crochet
- DC – Double Crochet
- SLST – Slip Stitch
- DEC – Decrease
- MR – Magic Ring
- Dec – Decrease
- Inc – Increase
- FO – Finish Off
How to crochet baby bunny amigurumi?
Are you ready to learn how to crochet this baby bunny, read the pattern and grab your crochet hook:
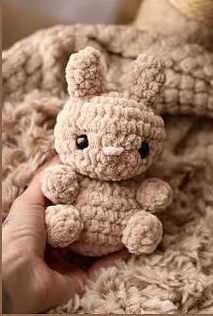
Finished size: Chubs are about 3-4 inches tall, but size may vary depending on
hook size, yarn, and tension.
Pattern Note: This is not a crochet class; you must have a basic understanding of crochet to complete this pattern. All the instructions have been in the US instructions.
Supplies Needed:
To get similar bunny amigurumi, make sure to have the below crochet materials and specific tools in hand:
- Chunky Cotton yarn is nice. The designer used:
- Premier Parfait Chunky in Toffee
- Bernat Blanket Yarn in Pink Dust
- L&T Faux Fur Yarn in Gold Frost
- Poly-fil or other stuffings
- 4.5mm Crochet Hook
- 12mm Safety Eyes
HEAD
- R1. 8sc in mr (8)
- R2. Inc x8 (16)
- R3. (1sc, 1inc) x8 (24)
- R4. (2sc, 1inc) x8 (32)
- R5-7. Sc around (32)
*insert safety eyes between R6 and R7 about 6-7 stitches apart* *begin stuffing*
- R8. (2sc, 1dec) x8 (24)
- R9. (1sc, 1dec) x8 (16)
- R10. Dec x8
SI St, FO, and sew remaining opening closed
BODY
- R1. 8sc in mr (8)
- R2. Inc x8 (16)
- R3. (1sc, 1inc) x8 (24)
- R4. (2sc, 1inc) x8 (32)
- R5-8. Sc around (32) *begin stuffing*
- R9. (2sc, 1dec) x8 (24)
- R10. (1sc, 1dec) x8 (16)
- R11. Dec x8 (8)
- SI St, FO, leave long tail for sewing
EARS (make 2)
- R1. 6sc in mr (6)
- R2-4. Sc around
- SI St, FO, leave long tail for sewing
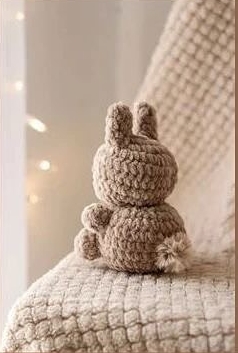
TOP NUBS & TAIL (Make 3)
R1. 6sc in mr (6)
R2-3. Sc around (6)
SI St, FO, leave long tail for sewing
BOTTOM NUBS (Make 2
R1. 8sc in mr (8)
R2-3. Sc around (8)
SI St, FO, leave long tail for sewing
ASSEMBLY & FINISHING TOUCHES
EARS – Sew ears around R2-4 about 1 stitch apart. Keep in mind the eyes are closer to the bottom of the head.
ARMS – Sew arms between R8 and R9 about 7 stitches apart
LEGS – Sew legs between R5 and R6 about 5 stitches apart
NOSE – I thread the nose with a pink yarn about the width of 1-2 stitches centered right between both eyes.
FACE SHAPING – I chose to indent my bun’s eyes, you don’t have to do this! I just love the shape it gives Chub’s cute little face.
TAIL – Sew the tail between R5 and R6 directly centered on the bum Chubs.