How to Crochet Mushroom Amigurumi For Garden Decor
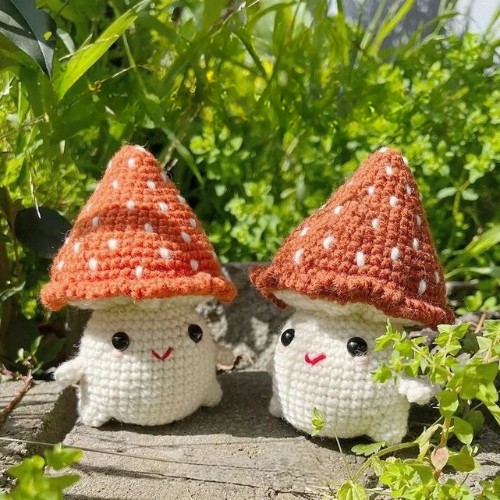
Learn how to crochet these mushroom amigurumi to add new and bright colors to your garden greenery. They have been crocheted in cartoonish art, which means they are cuter than usual mushroom toys. They can also sit on any surface. So, don’t miss making this crochet project your next one; these are perfect for decorations and to play with.
Designer: kokomakes__
Techniques Used and Their Abbreviations
This amigurumi mushroom pattern will need general to little advanced crochet amigurumi skills. You can learn all of them from the following links. To make it easy for you to follow the pattern, there are also abbreviations written together:
- CH – Chain Stitch
- SC – Single Crochet
- DC – Double Crochet
- SLST – Slip Stitch
- MR – Magic Ring
- INC-Increase
- FLO – Front Loop Only: This means working in the FL of the top loops.
- DC INC – Double Crochet Increase
- DEC – Decrease
- FO – Fasten Off
How to Crochet Mushroom Amigurumi
Each part of this crochet mushroom will be crocheted separately and then sewn down together. Follow through the below pattern for learning each of these parts:
Supplies
To get the exact similar look as the designer got for this amigurumi, gather the below supplies in specific types as described below:
- Yarn in the color you choose here (cotton is one of the most recommended choices); the designer uses 8ply wool yarn in dark amber and cream white.
- Plastic safety doll eyes
- Crochet Hook – Size 3mm
- Stitch Markers
- Yarn Needle
- Scissors
Instructions
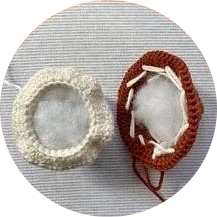
Top
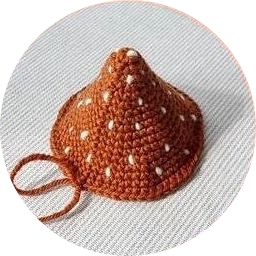
R1: 6SC in Magic Ring (6)
R2: 6INC (12)
R3: 12 SC (12)
R4: (SC, INC)*6 (18)
R5:18SC (18)
R6: (SC, INC, SC)*6 (24)
R7:24SC (24)
R8: (3SC, INC)*6 (30)
R9: (2SC, INC, 2SC)*6 (36)
R10 R11:36SC (36)
R12: (5SC, INC)*6 (42)
R13: (3SC, INC, 3SC)*6 (48)
R14:48SC (48)
R15: (7SC, INC)*6 (54)
R16: (4SC, INC, 4SC)*6 (60)
R17: 60SC, SLST, CH1, do not cut off yarn (60)
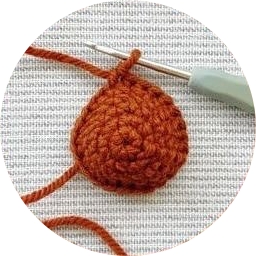
To sew on the spots, start from the top and work your way downwards in a spiral direction, finish off by tying a knot on the back side.
Feet (Make 2)
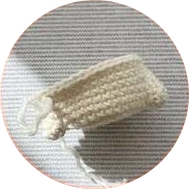
R1: 6Sc in Magic Ring (6)
R2: (Sc, Inc)*3 (9)
Arms (Make 2)
R1: 6Sc in Magic Ring (6)
R2: 6Sc (6)
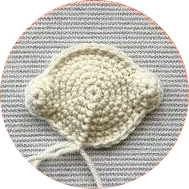
Body
R1: 6SC in Magic Ring (6)
R2: 6INC (12)
R3: (SC, INC)*6 (18)
R4: (SC, INC, SC)*6 (24)
R5: (3SC, INC)*6 (30)
R6: 8SC, merge together 3SC with first foot piece (right side facing each other), followed by 12SC, continue to merge 3SC with second foot piece, followed by 4SC (30)
R7: 8SC, merge together the remaining 6SC of first foot piece, followed by 12SC, merge 6SC of second foot piece, followed by 4SC (36)
R8:36SC (36)
R9: 14SC, INC, 10SC, INC, 10SC (38)
R10 R15: 38SC (38)
R16: (17SC, DEC)*2 (36)
R17:36SC (36)
R18: (2SC, DEC, 2SC)*6 (30)
R19:30SC (30)
R20: FLO 30DC INC (60)
R21: 60SC, FO and weave in ends (60)
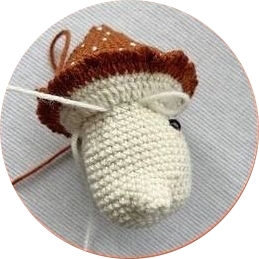
Eyes and Mouths
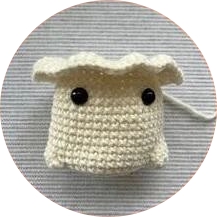
Start from the bottom centre, count to R15, with 6SC gap in between, insert safety eyes on each side.
Sew on blush and mouth.
Stuff both top and bottom, the trick here is not to overfill, the bottom of mushroom should be able to sit flat on a table top.
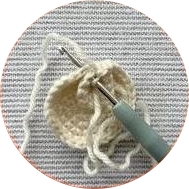
Line the mushroom top with body, it should have the same number of stitches (60). Continue working with the uncut yarn from the top piece, crochet SC, 2CH, repeat* work around the edge to join the two parts together, FO and weave in ends.
Sew on arms – 8 Rows directly above side of foot.
Start from the back, sew running stitches along the top, pull tight and fasten off.