How to Crochet Dino Amigurumi For Dinosaur Lovers
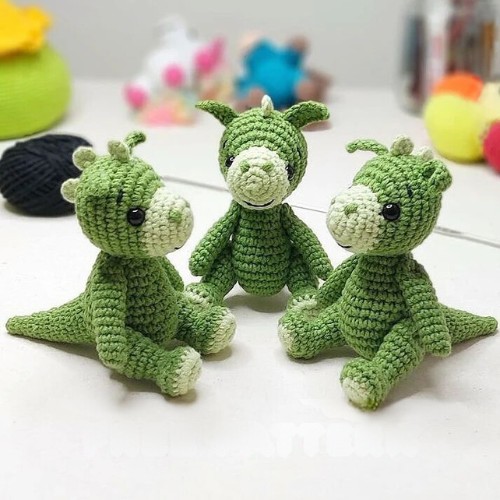
Do you have a dino lover? If you answer yes, try this crochet dino pattern to recreate a cute, imaginative dinosaur as amigurumi to bring smiles to him/her. Since they only sit, they will decorate the shelves, desktops or any other area like this. You will find every detail about this project and the complete guide in this pattern with visuals. So, start crocheting these happy dinos today!
Designer: _funny_toy_ On Instagram
US standard abbreviations
This crochet dino pattern for its amigurumi is a great way to practice the amigurumi skills and most basic crochet stitches. Below are the techniques used in the pattern (learn from the links) and short-term for each:
- Magic ring
- CH – Chain Stitch
- SC – Single Crochet
- SLST – Slip Stitch
- hdc half double crochet
- dc – double crochet
- Sewing pieces together
How to Crochet Dino Amigurumi?
Are you ready to learn how to crochet dino amigurumi to bring the prehistoric vibe to home? Follow through the crochet pattern below:
Skill Level: Beginner
Supplies Needed
If you want to mimic this baby dino amigurumi exactly like the photos, make sure to have the below crochet materials and specific tools in hand:
- Yarn – Yarn Art Jeans – 50g/160m (55% cotton, 45% polyacrylic) Such blends will give you the characteristics of both cotton and acrylic yarn. Colors used:
- Grassy color (69) – a quarter of a skein
- Light green color (11) – little.
- Yarn “Iris” or any other thin cotton yarn – black.
- Hook 1.5 mm.
- Safety Eyes on a secure mount – 6 mm. (You can avoid this, too, if you have a little one)
- Filler for toys (holofiber, polyester fiberfill, etc.).
- Stitch Markers
- Sewing needle.
- The yarn needle is long – 15 cm.
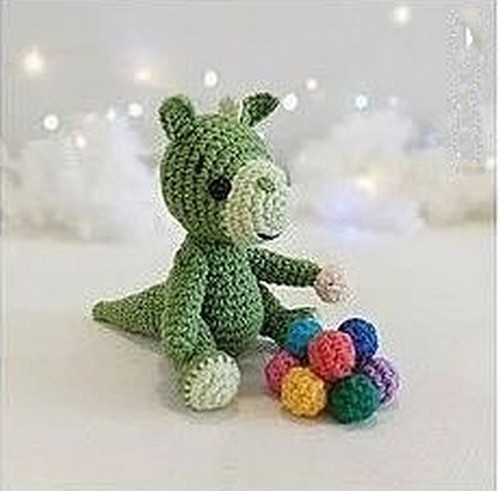
The height of the toy is 11 cm in case you have used the recommended yarn and crochet with the “ticks” technique.
Body
Start (hook 1.5 mm): Yarn Art Jeans – grassy color (69).
Stuff the legs with the filler as you crochet.
R1 magic ring 6
R2 inc 6 (12)
R3 *sc 1, inc 1* 6 times (18)
R4 *sc 2, inc 1* 6 times (24)
R5 *sc 3, inc 1* 6 times (30)
R6-8 (3 rnds) sc 30 (30)
R9 *dec 1, sc 3* 6 times (24)
R10-11 (2 rnds) sc 24 (24)
R12 *dec 1, sc 2* 6 times (18)
R13-14 (2 rnds) sc 18 (18)
R15 dec 1, sc 1* 6 times (12)
We leave a long thread tip for sewing. Cut the thread and fix it with a knot.
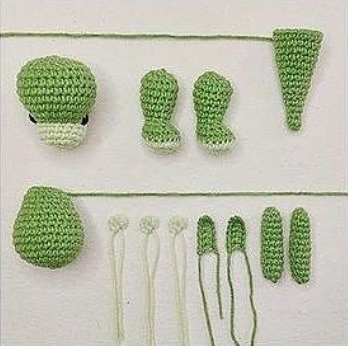
Head
Start (hook 1.5 mm): Yarn Art Jeans – light green color (11).
Stuff the legs with the filler as you crochet.
R1 magic ring 6
R2 inc 6 (12)
R3 *sc 1, inc 1* 6 times (18)
R4-6 (3 rnds) sc 18 (18)
R7 change the color to grassy (69), sc 6, inc 6, sc 6, (24)
R8 sc 6, *sc 1, inc 1* 6 times, sc 6 (30)
R9-13 (5 rnds) sc 30 (30)
Insert eyes between 7-8 rounds, before the first increase stitch and after the last increase stitch.
R14 dec 1, sc 3* 6 times (24)
R15 dec 1, sc 2* 6 times
(18)
R16 sc 1, dec 1* 6 times
(12)
R17 dec 6 (6)
Cut the thread and fix it with a knot. Pull the hole, hide the thread inside.
Legs (2 pcs)
Start (hook 1.5 mm): Yarn Art Jeans – light green color (11).
Stuff the legs with the filler as you crochet.
R1 magic ring 6
R2 inc 6 (12)
R3 inc 1, sc 3, inc 3, sc 3, inc 2 (18)
R4 change the grassy color (69), sc 18 (18)
R5 sc 3, dec 6, sc 3 (12)
R6 sc 3, dec 3, sc 3 (9)
R7 sc 9 (9)
R8 *sc 2, inc 1* 3 times (12)
R9 sc 12 (12)
R10 *sc 5, inc 1* 2 times (14)
R11 *sc 6, inc 1* 2 times (16)
R12 *sc 7, inc 1* 2 times (18)
R13 *sc 1, dec 1* 6 times (12)
R14 dec 6 (6)
Cut the thread and fix it with a knot. Pull the hole, hide the thread inside.
Arms (2 pcs)
Start (hook 1.5 mm): Yarn Art Jeans – grassy color (69).
Stuff the legs with the filler as you crochet.
R1 magic ring 6
R2 *sc 1, inc 1* 3 times (9)
R3-10 (9 rnds) sc 9 (9)
R11 *dec 1, sc 1* 3 times (6)
Cut the thread and fix it with a knot. Pull the hole, hide the thread inside.
Tail
Start (hook 1.5 mm): Yarn Art Jeans – grassy color (69).
Stuff the legs with the filler as you crochet.
R1 magic ring 6
R2-3 (2 rnds) sc 6 (6)
R4 *sc 1, inc 1* 3 times (9)
R5-6 (2 rnds) sc 9 (9)
R7 *sc 2, inc 1* 3 times (12)
R8-9 (2 rnds) sc 12 (12)
R10 sc 3, inc 1* 3 times (15)
R11-12 (2 rnds) sc 15 (15)
R13 *sc 4, inc 1* 3 times (18)
R14-15 (2 rnds) sc 18 (18)
Fix it with a knot. Leave the thread for sewing.
Ears
Start (hook 1.5 mm): Yarn Art Jeans – grassy color (69).
Make ch st 7, from the second loop from the hook sc 1, hdc 1, dc 4
Fix it with a knot. Leave the thread for sewing.
Spines
Start (hook 1.5 mm): Yarn Art Jeans – light green color (11).
3 pcs
R1 magic ring 6
Fix it with a knot. Leave the thread for sewing.
Sew head to body
Use the thread left on the body.
The body and head have the same number of loops, sew the “loop to loop” technique (each loop on the body corresponds to a loop on the neck).
Sew in a circle, leave a small hole and fill the neck with filler, sew up the hole. You can sew one more circle.
Head decoration
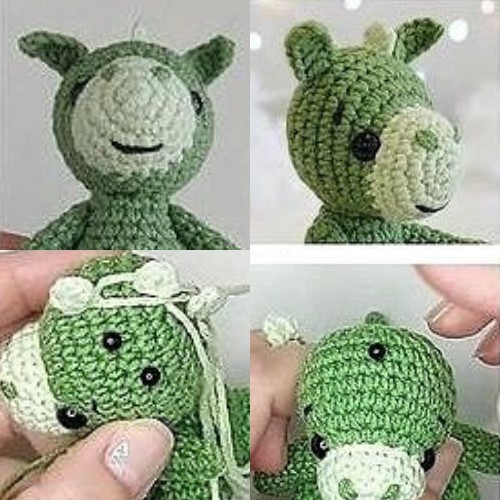
- Embroider the nose
- Embroider mouth and eyebrows
- Sew on the ears and spines.
Thread connection of arms and legs.
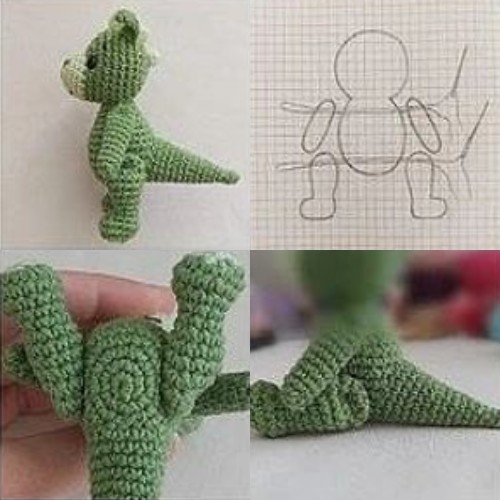
Mark the position of the arms and legs on the body.
Put marks for arms between 2nd and 3rd rows from the head sewing seam.
Put marks for legs between 6th and 7th rows from the magic ring,
Mark the location of the buttons on the arms and legs.
Put marks on the arms between 2nd and 3rd rows from the top of the arm.
Put marks on the legs between 2nd and 3rd rows next the top of the leg.
Use a long needle to pull the thread through the three parts: arm (leg), body, arm (leg).
Make two circles, tighten, and fix the thread with a knot.
Hide the ends of the thread inside.
Or use a thread folded in half.
Sew on the tail
Congratulations, your toy is ready!